
| Command | Description |
|---|---|
git branch |
Lists / creates and deletes branches |
git switch |
Switches between branches |
git checkout |
Switches between branches |
git merge |
Merges branches |
git merge --abort |
Aborts a merge |
git merge --squash |
Squaches commits on branch into a single commit and merge |
git branch -d feature |
Deletes the feature branch |
git stash |
Stores made changes for later use |
git stash -m "stashing message" |
Stashes your changes and includes a message |
git stash list |
Shows all of your stored stashes |
git stash apply |
Applies your latest stash |
git stash apply stash@{n} |
Applies a specific stash |
git stash pop |
Applies your latest stash and removes it from stash list |
git stash pop stash@{n} |
Applies a specific stash and removes it from stash list |
git cherry-pick <commithash> |
Applies changes from <commithash> |
git rebase |
Different way of integrating changes from two branches |
Session 4: Branches
Track, organize and share your work: An introduction to Git for research
Course at Max Planck Institute for Human Development
![]()
![]()
12:00
1 Last session: Setup & First steps with Git
Last session: Learning objectives
After the last session, you should now be able to answer the following questions / do the following:
Setup
💡 You know how to set up Git for the first time
💡 You have set up Git on your computer
💡 You understand the difference between the three Git configuration levels
💡 You know how to configure your username and email address in Git
💡 You have set up your preferred text editor when working with Git
💡 You can escape the command-line text editor Vim
First steps with Git
💡 You can initialize a Git repository
💡 You can stage and commit changes
💡 You know how to explore the commit history
💡 You can compare different commits
💡 You know how to use and create a .gitignore file
💡 You can discuss which files can (not) be tracked well with Git and why
💡 You know how to track empty folders in Git repositories
Last session: recipes project
At the end of this session, you should have accomplished the following:
- You set up Git.
- You initialized your
recipesfolder as a Git repository. - You committed your first recipe to the
recipesrepository.
Please keep the recipes folder! We will continue to use it in the following sessions.
2 This session: Branches
Branches
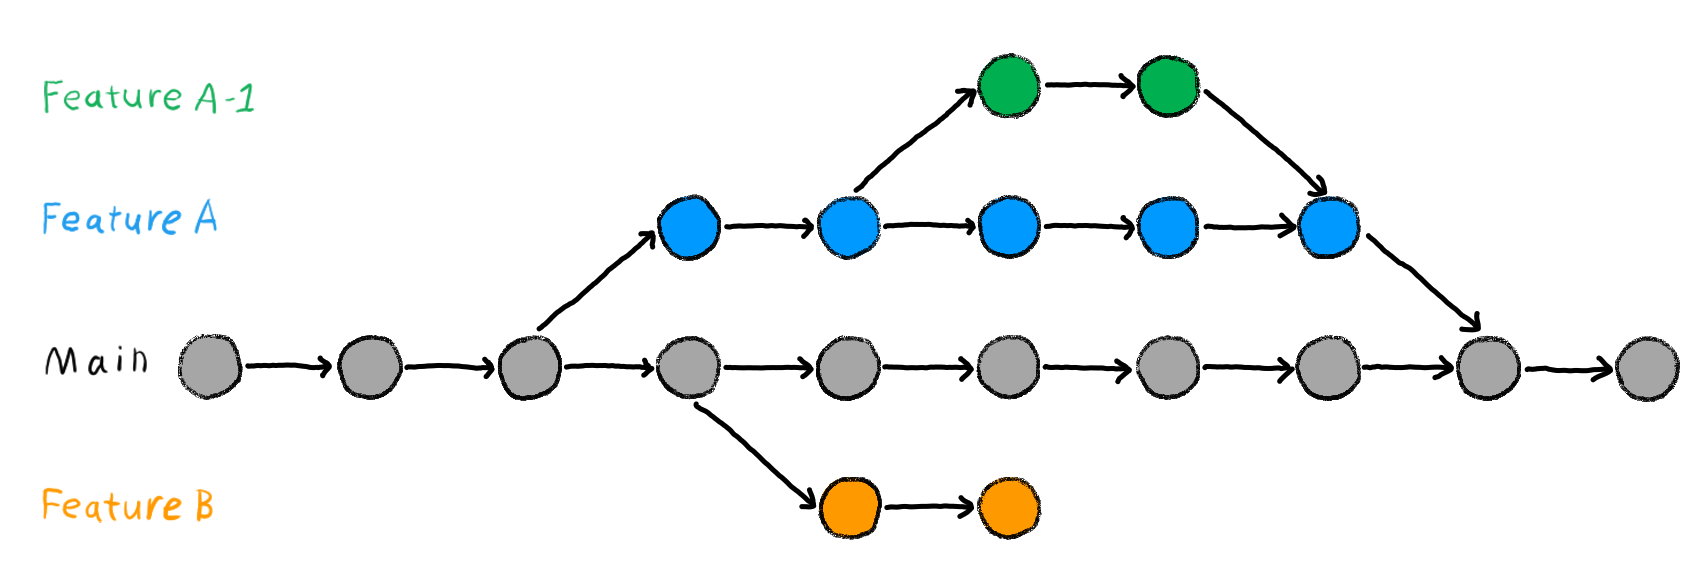
Figure 1: Image from Chapter “Git Branches” of the “The Turing Way handbook to reproducible, ethical and collaborative data science”, used under a Creative Commons Attribution 4.0 License.
Reading
https://lennartwittkuhn.com/version-control-book/chapters/branches.html
Learning objectives
💡 You understand the purpose and benefits of using branches in Git
💡 You can create and switch between branches
💡 You can merge branches and resolve merge conflicts
💡 You can name at least three best practices when working with branches
Cheatsheet
Tasks
In this session, you will work on the following tasks:
- Reading: Read the chapter “Branches” in the Version Control Book.
- Implementation: Try out the commands in the chapter.
- Exercises: Work on the exercises for the
recipesproject. - Quiz: Test your knowledge with the quiz.
As always:
- Try out the commands of this session and play around with them.
- Check whether you have achieved the learning objectives.
- Ask questions!
- Let’s git started!
recipes project
At the end of this session, you should have accomplished the following:
- You created a new branch and merged changes to your main branch
- You created and resolved a merge conflict
Please keep the recipes folder! We will continue to use it in the following sessions.
Exercises
1. Create and merge a branch
- Create a new branch called
feature. - Switch to the new branch.
- Add a new recipe to your
recipes.txtfile. - Stage and commit the changes to your
recipes.txtfile on thefeaturebranch. - Switch back to the default branch (
mainormaster). - Merge the
featurebranch with your default branch. - Delete the
featurebranch.
2. Create and resolve a merge conflict
- Deliberately create a merge conflict by editing the same section of a file on two separate branches and attempting to merge them. An example can be found in the Version Control Book chapter.
- Resolve the merge conflict.
- Delete the feature branch afterwards.
Version Control Course