Code
git branch This chapter introduces Git branches and their advantages for projects by enabling work on different versions simultaneously. Branches allow you to explore new ideas or address issues without altering the main project. We explain how to create and manage branches for parallel work and cover merging changes from different branches, including resolving conflicts. Additionally, we discuss stashing, which lets you temporarily set aside changes to switch tasks. By the end of this chapter, you’ll understand how branches support concurrent project development and help keep your research organized.
In research, you often need to extend or modify a previous analysis, such as adding new data, refining methods, or testing alternative hypotheses. By creating a branch, you can develop this new version without risking the integrity of the previous working version. If necessary, you can easily switch back to the previous branch to reproduce or reference results.
A collaborator may request to review specific outputs, such as plots or results from a previous stage of the project. If you are in the middle of implementing new features or conducting a different analysis, this can create a problem. By using branches, you can keep the current experimental changes isolated. This allows you to quickly switch to the previous branch to provide the requested results without disrupting your ongoing development.
In short, branches in Git allow you to keep different versions of your repository content in parallel, develop them independently, and integrate them when they are ready. Before we explain the concept of branches in more detail, let’s look at a few scenarios that illustrate why branches are useful (taken from The Turing Way Community 2022):
You want to add a new feature to your project (for example, a new analysis) but while doing so, you run the risk of accidentally breaking your working code as you test the new feature. You may want to quickly go back to your previous working version while working on the new feature but keep the as yet unfinished progress on the new feature.
If you collaborate with others on the same Git repository (we will look at collaboration with Git in the chapter on Git remotes) and everyone would work on the default branch simultaneously, this could cause a lot of confusion and conflicting changes.
By default, every Git repository has one default branch, typically called main or master. If you have just recently started using Git, your repository likely has only one branch (main or master) with one commit after another (see they gray dots in Figure 7.1). Git branches are like separate versions or workspaces within the same Git repository. Branching allows to create a copy of a project and continue to make commits without integrating them into the default branch right away. Branches let you work on a parallel version of your repository’s contents without changing the content on your default branch (your main or master branch). You can visualize branches as shown in Figure 7.1.
Each branch keeps its own history of changes, so you can develop things in parallel and merge changes between branches when you’re ready. Even if you are not happy with what you’ve developed on a branch, you can just delete or abandon the branch and continue with what you have on the default branch (see the “Feature B” branch in Figure 7.1). You can have as many branches as you want and also branch off from a branch that branched off from the default branch (see the “Feature A-1” branch in Figure 7.1).
Branches are great for trying out new features, fixing bugs, or experimenting without causing chaos in the main development branch. Scientists might use branches to collaborate on research papers, exploring different parameters while running experiments or to test different data processing techniques or visualization approaches during data analysis. Git makes it easy to switch between branches and handle conflicts when merging. With branches, you can work independently and keep your code organized.
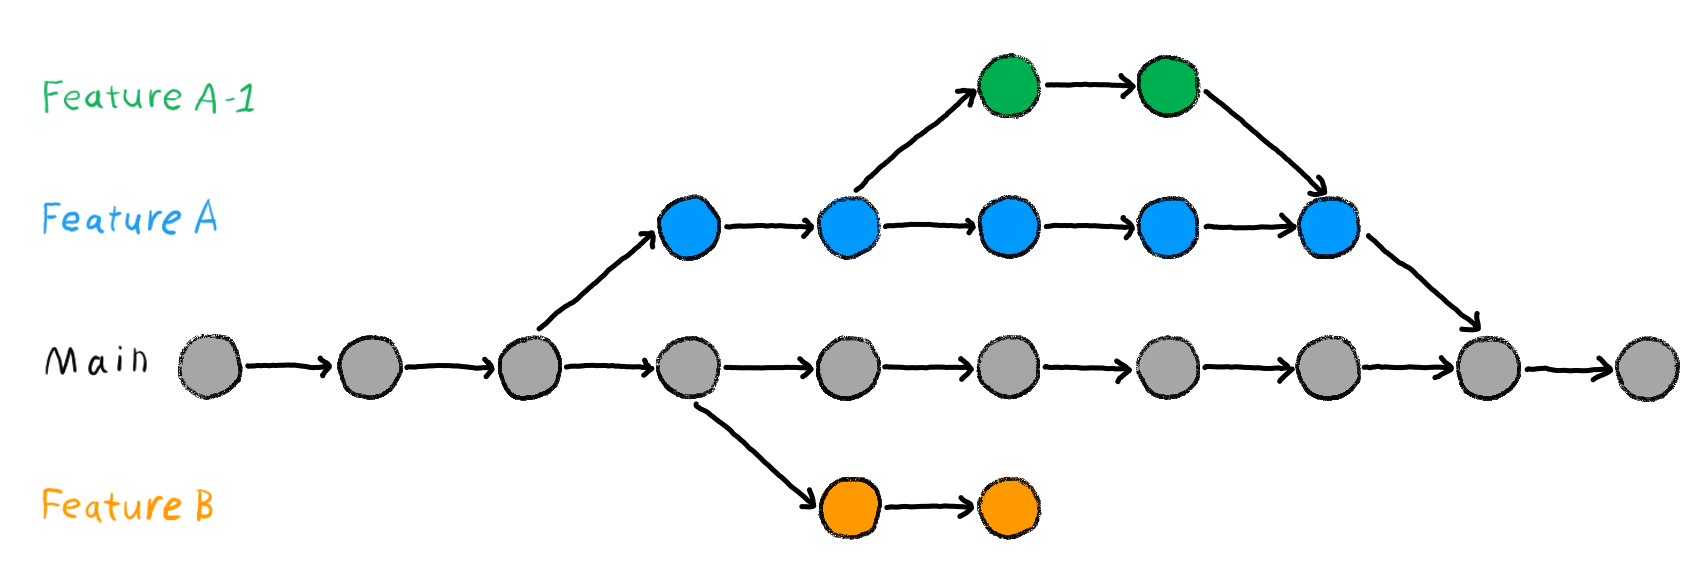
Main branch are shown in gray. The branch Feature A (blue circles) was created from the Main branch and later merged again. In-between, another branch Feature A-1 was created from the Feature A branch (green circles) and merged with that branch again before the Feature A branch was eventually merged with the Main branch. The branch Feature B was created but abandoned and not merged with the Main branch. Image from Chapter “Git Branches” of the “The Turing Way handbook to reproducible, ethical and collaborative data science”, used under a Creative Commons Attribution 4.0 License.
By default, your work is on the default branch, usually called main (or master). We recommend changing your default branch name to main, as discussed in the setup chapter 1. You can list the available branches in your repository by using git branch:
Code
git branch This should return the following output, if you have not yet created a new branch:
Output
* mainThis output indicates that you are currently “on the branch” named main. The asterisk (*) in front of the branch name indicates the active or current branch in your Git repository.
In Git, you can have multiple branches in your project, and the git branch helps you see the list of available branches. The one with the asterisk is the branch where your working directory is currently positioned. In this case, main is the active branch. If there were other branches listed without an asterisk, it means they exist, but you are not currently “on” those branches. You are currently “on main”.
You can also use git status to check which branch you are on. git status will return an output similar to the following:
Output
On branch main
nothing to commit, working tree cleanTo create a new branch, use git branch followed by a branch name. For example, to create a new branch called feature run the following command:
Code
git branch featureNow you can use git branch again to confirm the creation of the new branch.
Code
git branch This should return the following output:
Output
  feature
* main
Your newly created branch (here, feature) will show up, but your active branch should still be main. Note that feature is just a name. You could also call your branch banana, if you want. Find out more about naming convention for Git branches in the section on best practices below.
git branch flags
-a or --all: Lists both local and remote branches. (Remote branches will be introduced in the Remotes: Introduction chapter )
-r or --remote: Lists only remote branches.
-d or --delete: Deletes a specified branch. For example, git branch -d feature.
-D or --force: Force deletes a branch, even if it has unmerged changes.
-m or --move: Renames a branch. For example, git branch -m old-branch new-branch.
-c or --copy: Creates a new branch by copying an existing branch. For example, git branch -c existing-branch new-branch
-v or --verbose: Shows more information when listing branches, including the last commit message.
To create a new branch using the RStudio GUI, follow these steps:
Access the Git Pane: Locate the Git pane, usually found in the top-right corner of the RStudio interface.
Create a New Branch: On the top of the pane, on the left side to the name of the branch you are currently on, there is a purple branch symbol. Click on it.
Name the New Branch: A prompt will appear asking you to name the new branch. Enter the desired name for your new branch, for example, feature. You can also choose to setup a remote branch with the same name.
Create and Switch to the New Branch: After naming the new branch, click “Create” to create the branch. RStudio will create the new branch and automatically switch to it. You should see a confirmation message indicating the successful creation and switch to the new branch.

To switch to another branch, you can use git switch. For example, enter the following command to switch to the newly created feature branch:
Code
git switch featureAlternatively, you can also use git checkout to switch branches. For details about the differences between git switch and git checkout, see Note 7.1.
Code
git checkout featureIf you switched branches successfully, you should receive an output similar to this:
Output
Switched to branch 'feature'Now you can work on this branch as usual, staging and committing changes, as introduced in the chapter on basic Git commands.
Before you can switch branches for the first time, you need to have made at least one commit on your current branch (for example, on the main branch). This requirement ensures that there’s a baseline history in your repository, allowing Git to manage changes.
git checkout and git switch?
Prior to Git version 2.23, the git checkout command was the primary way to switch branches. It allows you to move to a different branch and update your working directory to reflect the state of that branch. In Git 2.23 and later versions, the git switch command was introduced as a safer and more intuitive alternative to git checkout. It simplifies the branch-switching process and provides clearer feedback in case of errors.
git checkout is a versatile and powerful command that, among other things, was traditionally used for switching branches. However, it has other use cases like checking out specific files or commits. It can be used for branch switching, but it may have some ambiguity in its syntax, especially when used for other purposes.
To switch to another branch using the RStudio GUI, follow these steps:
Access the Git Pane: Locate the Git pane, usually found in the top-right corner of the RStudio interface.
View Branches: In the Git pane, you should see the name of the branch you are currently on. E.g. “Main” or “Master”. Click on the name of your current branch. This will open a dialog showing the current branch and available branches.
Switch to Another Branch: In the branches dialog, you will see a list of branches. Locate the branch you want to switch to, for example, feature. Click on the branch name (e.g., feature) to select it. After clicking on it, RStudio will switch to the selected branch. You should see a confirmation message indicating the successful switch, similar to the command line output: Switched to branch ‘feature’

This section references more advanced Git commands. If you’re facing the issue that Git prevents you from switching branches, read on. If you’re just learning about branches and switching branches worked without any problems, feel free to skip this section for now.
When you have uncommitted changes in your working directory that do not conflict with the branch you’re switching to, Git allows you to switch branches without losing those changes. Your uncommitted changes are effectively brought over to the new branch. This feature can be particularly useful when you’ve started making changes and then realize you’re on the wrong branch or need to move your work to a different context.
Git is designed to prevent you from switching branches if there’s a risk of overwriting your changes. This means that Git will not allow you to switch branches if your uncommitted changes would cause conflicts with the branch you’re attempting to switch to. If you try to switch branches with uncommitted changes you will get an error message similar to:
Output
error: Your local changes to the following files would be overwritten by checkout:
        example.txt
Please commit your changes or stash them before you switch branches.
Aborting
The message specifies the file with modifications (here, example.txt), and indicates an aborted branch switch due to uncommitted changes. To resolve this and switch branches safely, you have a few options:
Commit your changes: Use the stage and commit process to save your work on the current branch. This involves staging your changes with git add and then committing them with git commit. This workflow is explained in detail in the chapter on basic Git commands.
Stash your changes: If you’re not ready to commit, you can use git stash to temporarily shelve your changes. This clears your working directory, allowing you to switch branches. Your stashed changes can be reapplied later. Stashing is covered in more detail in the section below.
Discard your changes: If the changes are not needed, you can remove them using git reset to unstage all changes. This action should be used with caution as it will erase your modifications. This command is covered in the chapter “Rewriting history”.
After you’ve worked on a branch for some time and you completed work on the feature that you wanted to implement, you might want to incorporate your work into the main branch (or any other target branch). You can do this using the git merge command. To do this, switch to your main branch (using git switch or git checkout) and then use:
Code
1git merge featurefeature with the name of your branch, if needed.
Note, that your current branch (the branch that you are “on”) should be the one that you want to merge changes into from another branch. For example, if you want to merge changes into the main branch from the feature branch, you need to be on main and then merge the feature branch.
If you have not yet made any changes on the feature branch you should get the following output:
Output
Already up to date.This output indicates that the branch you are trying to merge is already fully incorporated into the branch you are currently on. In other words, there are no new changes in the feature branch that need to be merged because your current branch already contains all the changes from the feature branch.
If you have changed file(s) in your folder and committed them on the feature branch, you’ll likely get an output similar to:
Output
Updating 555ba0c..994bb8d
Fast-forward

 example.txt    |   4 ++++

 1 file changed
The output reveals a “fast-forward” merge operation, where changes from commit 555ba0c to 994bb8d are incorporated. The common starting point of the two branches is commit 555ba0c and commit 994bb8d marks the latest commit in the merged branch. A “fast-forward” merge, the simplest form of merges, updates your position to the latest changes without creating a new commit. In this example, the merge modified only one file, the example.txt file, introducing four new lines denoted by 4 ++++. For more information about different types of merges, see the section on “Types of merges” below.
There is no built-in Git command to merge all branches into the current branch with a single command, primarily because mass-merging can be risky and prone to conflicts. That said, it is technically possible using a script or loop that identifies all branches and merges them one by one. However, since this approach is generally discouraged and can lead to complex merge issues, we do not include instructions in this guide. If needed, you can find examples and tutorials online.
Merge conflicts occur when Git is unable to automatically resolve differences between two branches during a merge. This happens when both branches include conflicting changes to the same part of a file. Git simply can’t determine which version of the code should be favored, and as a result, it requests manual intervention from you, the developer. It’s similar to when two people try to edit the same part of a file at the same time, and Git gets confused about whose changes to keep. Merge conflicts are more likely to occur in collaborative projects, where multiple people modify the same files. However, they can also happen in projects where you work on your own.
Merge conflicts can be a bit of a headache. If you only work locally on your computer, without a remote repository (for example, an online version of your repository on GitHub or GitLab), you can avoid merge conflicts easier because you are less likely to edit the same part of the same file on different branches. However, once you start to collaborate with others, it may not be possible to entirely avoid merge conflicts. That being said, employing good development practices can minimize the occurrence of merge conflicts. Regularly pulling changes from the remote repository into your local branch (using git pull) and keeping your branch up-to-date can help identify and resolve conflicts early. You will learn more about how to effectively manage collaborative work on Git repositories in the following chapters on remote repositories.
Let’s look at an example merge conflict. You can recreate this example yourself by following the instructions below. In order for this example to work, you need to have at least one previous commit on the main branch.
example.txt.feature.example.txt file, for example Git is super.feature branch.main branch.example.txt file, for example Git is cool. Note that example.txt should be empty because the previous text was added on the feature branch, not on the main branch.main branch.feature branch into the main branch: git merge feature.When a merge conflict arises, you should not view it as a limitation of Git but rather as a helpful feature. If you try to merge branches with conflicting changes in a file the output looks similar to this:
Output
Auto-merging example.txt
CONFLICT: Merge conflict in example.txt
Automatic merge failed; fix conflicts and then commit the result.
During a merge conflict, you can run git status to see which files are in conflict:
Output
On branch main
You have unmerged paths.
  (fix conflicts and run "git commit")
  (use "git merge --abort" to abort the merge)

Unmerged paths:
  (use "git add <file>..." to mark resolution)
    both modified:   example.txt

no changes added to commit (use "git add" and/or "git commit -a")
Git will highlight the conflicting parts in the affected file(s), and you must choose the desired changes or modify them to create a consistent version. To do this, open up the file(s) with conflicts in a text editor of your choice, and you’ll see the conflicting sections marked with the following indicators:
<<<<<<<=======>>>>>>>In our example, this will look like this:
Output
<<<<<<< HEAD
Git is cool
=======
Git is super
>>>>>>> feature
<<<<<<< indicates the beginning of lines that encountered a merge conflict. The initial lines are from the file where you were attempting to merge the changes (in this case, the changes on the main branch). The lines between <<<<<<< HEAD and ======= represent the changes that were made in your current branch (here, the main branch). ======= shows the break point for comparison. It divides the changes the user has committed (above) from the changes brought in from the merge (below) for visual comparison. The section between ======= and >>>>>>> represents the changes from the branch you are trying to merge into your current branch (here, the feature branch). >>>>>>> shows the end of the lines with a merge conflict.
To resolve the merge conflict, you need to manually edit the conflicting sections to the desired state, removing the conflict markers. You might want to keep some changes from your current branch, some from the merged branch, keep only the changes from one branch, or make entirely new changes. After editing the file it might look something like this:
Output
Git is super cool!In this example, the conflict has been resolved by mixing both sets of changes. Parts of the changes from both branches are now present in the file. If you are done you can use git add to stage the resolved changes:
Code
git add example.txtOnce all conflicts are resolved, proceed with the commit, for example:
Code
git commit -m "Resolve merge conflict"Your branches should now be merged and your conflict resolved. The feature branch itself remains unchanged unless you delete it. You can continue using it or delete it if it’s no longer needed.
Before you try to fix more complex merge conflicts, make sure you understand the changes that don’t match up to avoid making things more complicated. Resolving conflicts can be tricky, especially when merging branches with many differences. But remember that your old versions are safe, so you can fix the issue without affecting them.
If you feel like you are stuck in the merge process and want to get back to the state of the branch before you started the merge process, you can also abort the merge using:
Code
git merge --abortgit merge flags
--abort: Abort the current merge operation and reset the branch to its pre-merge state.
--continue: Continue the merge process after resolving conflicts.
--log: Include the log message from the commit(s) being merged in the new merge commit.
Git supports different types of merges to support various situations in software development. Each merge type has its purpose and advantages, allowing developers to choose the most suitable approach based on their specific project needs and workflow.
In a standard merge, Git takes each commit from the merged branch and adds them to the history of the base branch (the branch you are currently on) with their original time stamps. It creates a new “merge commit”, a special record that marks when the merge happened, showing that the branches are now combined. To perform a standard merge, use the following command:
Code
git merge If no new commits were made to the base branch since the feature was created, Git automatically does a “Fast Forward Merge”. It’s like the standard merge, but no new merge commit is created. It’s as if you made the commits directly on the base branch. Since the base branch remained unchanged, there’s no need to mark a separate merge in the history. You can ensure a fast-forward merge by using the --ff-only flag:
Code
git merge --ff-onlyIf you do not want a fast-forward merge, you can ensure a merge commit with the --no-ff flag.
Code
git merge --no-ffWhen you squash a branch, Git combines all commits of the branch into a single commit. This new commit is then added to the history, but the individual commits that were part of the branch are not retained or preserved separately. Instead, the squashed commit represents the collective changes made in the branch, creating a cleaner and more concise history.
Code
git merge --squashSquashing commits can be desirable in a situation where you don’t want others to see the full history of individual commits made on the merged branch. For example, if you wrote a script and only want your collaborators to see the end result and not all the tiny changes you made on the way. In this situation, you could squash all previous commits and only merge the latest version of your script.
Once a branch has served its purpose and is no longer needed, it can be deleted. Removing branches that are no longer active helps maintain a clean and manageable branch structure. To delete a branch, you can use the git branch command, followed by a -d flag.
Code
git branch -d featureThis should yield an output similar to:
Output
Deleted branch feature (was 2cb61c2).The addition (was 2cb61c2) represents the last commit hash of the branch you deleted. You can only delete a branch, you are not currently on.
main or master)?
Since Git treats the default branch (main or master) branch like any other branch, you can also delete the default branch if you want. This is however not recommended to avoid confusion and might even be forbidden or not possible in some projects.
The central purpose of branches is to keep the main branch clean. In practice, this means that you should regularly work on separate branches and only integrate new changes into the main branch when they are ready. The main branch should only contain work that is complete and rightfully belongs in the main version of your project. For example, if you use Git to track changes in code (like analysis scripts) you should make sure that the version of the code on the main branch always works, i.e., can be executed without errors. Any addition to your analysis code would be developed on a separate branch and only integrated with the main branch if the code can be executed without errors.
Adopt a consistent naming convention for branches that accurately reflects their purpose. This can include prefixes like feature/, bug/, followed by a descriptive name. Clear and standardized branch names make it easier to identify the purpose of each branch.
Basic recommendations for branch names
feature/new-login or bugfix/header-styling.feature--new-login, which can be confusing.feature-new-login-.Branch prefixes
Using prefixes in branch names helps to quickly identify the purpose of a branch. Below are two common branch types with their corresponding prefixes:
feature, for example: feature/new-analysis.bugfix, for example: bugfix/fix-typo.For more recommendations on branch naming conventions, see for example Amin (2023).
Create branches with a specific goal or task in mind, and aim to keep them short-lived. As for your default branch, you should try to keep individual branches clean by focusing on adding one new feature per branch. Long-lived branches can lead to conflicts and make it harder to merge changes. Once the task is complete or the feature is integrated, don’t forget to delete the branch to avoid clutter.
The best way to deal with merge conflicts, is to try and avoid them in the first place. You can reduce the chances of conflicts by keeping branches tidy, concentrating on one task, and involving fewer files. In addition, it’s good practice to merge each other’s changes into your work frequently. Before merging, understand the content in both branches. If multiple people have worked on the same branches, open communication and good project management can also help to stay informed about each other’s changes.
This section concludes the most important Git commands for working with branches for new learners. The following chapter will dive into more advanced Git commands that become relevant once you start using branches more extensively. If you’re just learning about branches and the commands above worked without any problems, feel free to skip the next chapter for now.
We would like to express our gratitude to the following resources, which have been essential in shaping this chapter. We recommend these references for further reading:
| Authors | Title | Website | License | Source |
|---|---|---|---|---|
| The Turing Way Community (2022) | The Turing Way: A handbook for reproducible, ethical and collaborative research | CC BY 4.0 | ||
| Chacon and Straub (2014) | Pro Git | CC BY-NC | ||
| GitHub (2023) | GitHub Docs | CC BY-NC 4.0 | ||
| CodeRefinery (2024) | Introduction to Version Control with Git. Aliases and Configuration | CC BY 4.0 | ||
| Amin (2023) | Naming conventions for Git Branches — a Cheatsheet | NA |
| Command | Description |
|---|---|
git branch |
Lists / creates and deletes branches |
git branch feature |
Creates the feature branch |
git branch -d feature |
Deletes the feature branch |
git switch |
Switches between branches |
git switch feature |
Switches to the feature branch |
git checkout |
Switches between branches |
git checkout -b feature |
Creates and switches to the feature branch |
git merge |
Merges branches |
git merge feature |
Merges the feature branch into the current branch |
git merge --abort |
Aborts a merge |
git merge --squash |
Squaches commits on branch into a single commit and merge |