Code
git initIn this chapter, we are exploring the most important basic Git commands that you will need in your everyday workflow. This includes initializing Git repositories as well as adding and committing files to Git.
It’s common to perform multiple analyses, run experiments, or manipulate datasets over time. By creating a Git repository, you can track every change you make to your analysis scripts, experimental code, or research notes. This helps in keeping a detailed history of your work, allowing you to revert back to any previous version if needed.
Let’s git started! First, we will create a so-called repository (or repo, for short). A repository is a regular folder on your computer that is tracked by Git. The full history of changes of a project and information about who changed what and when is also stored by Git in this folder.
To create a new Git repository, you need to initialize a folder as a Git repository. First, let’s create an empty folder using the command line 1. Alternatively, you can create a new folder using the graphical user interface of your computer’s file browser. Then use the command line to navigate to the folder which you want to initialize as a Git repository 2.
cd into your Git repository first!
A Git repository is a regular folder on your computer that is tracked by Git. Git repositories can be located anywhere on your computer, depending on where you placed them. To run Git commands in a specific repository from the command line, always remember to navigate to the relevant folder on your computer first. When you open a new terminal, it usually starts in your home directory (at Users/username). As explained in the command line chapter, you can check your current working directory using the pwd (“print working directory”) command and navigate to other folders using cd (“change directory”).
Once you are in the desired folder, run the git init command to initialize the folder as a Git repository:
Code
git initYou should see an output similar to:
Output
Initialized empty Git repository in /foldername/.git/Congratulations on successfully initializing your first Git repository! 🎉
Git is now able to track your file(s) and the changes you make in this folder. You only need to use git init once per folder.
You can also skip creating a folder manually and only use the git init command:
Code
1git init /Users/yourusername/Desktop/foldername/Users/yourusername/Desktop/foldername with the (absolute or relative) path to the folder which you want to initialize as a Git repository.
Git will create an already initialized folder at the path and with the name you use. Check your current working directory to be sure that you create the Git repository in the desired location 3. You can use both absolute and relative paths as arguments to the git init command to specify the location of your Git repository 4.
Git can now track every file you move, create or change in this folder. You can use this folder like any other normal folder on you computer. The only difference is the tiny but powerful folder called .git within it, which stores the full history of files and relevant metadata of your project, thereby enabling the tracking of your project progress.
.git folder?
If you want to verify that Git is tracking your folder, you can look for the .git folder. To do this navigate to the correct folder and use ls -a to receive a list of hidden files. If the folder has been initialized as a Git repository, you should see a folder called .git. Generally, you should not manually modify the .git folder, since doing so can corrupt your repository.
.git folder!
The .git folder in a Git repository contains all the essential information and configuration for the repository to function properly. Tampering with this folder can have serious consequences, as it can lead to data loss, corruption, or the inability to use the repository effectively. It’s essential to only modify Git repositories through Git commands and established workflows to ensure the integrity and reliability of your project. In short: Don’t mess with the .git folder.
git init
Short version (if you know what you are doing): To remove Git from a folder run:
Code
rm -rf .gitLong version: You may find yourself in a situation where you want to undo the initialization of a Git repository. For example, you initialized the wrong folder as a Git repository. Undoing an initialization is straightforward but should be approached with caution. To completely remove the Git setup from a folder, you can delete the .git directory within it. This is where Git stores all the information about the repository, including the history of commits and configurations. To do this, navigate to the directory of your Git project in the terminal and run the command rm -rf .git. This command forcefully (-f) removes (rm) the .git directory and all of its contents recursively (-r), effectively undoing the git init command. Be aware that this action is irreversible and will permanently delete the repository’s history and configurations, leaving you with just the working directory files (the files currently in your project folder).
Generally, you can organize your Git-initialized project folder in any way you want (just like a regular folder on your computer), for example by creating subfolders within your repository. This allows for better organization of your files and directories, making it easier to manage larger projects. Git will also track the changes in these subfolders. Git commands are designed to work recursively from the parent directory in which git init was executed 5. This means that if you use Git commands within any of the child directories (subfolders) of the repository, those commands will still apply to the entire repository context. For example, if you make changes to a file within a subfolder and commit those changes, Git will process this action in the context of the parent repository, ensuring that the entire project’s history is maintained cohesively.
After you initialized a Git repository, you can use git status to receive the current file tracking status from Git.
Code
git statusIf you initialized a new Git repository, you should see an output similar to the following:
Output
On branch main

No commits yet

nothing to commit (create/copy files and use "git add" to track)
Let’s unpack what this output means:
On branch mainThis tells you that you are currently working on the main branch of your Git repository. A branch is like a separate line of development in your project. The default branch is often configured during the setup of Git. You can find out more about branches in a later chapter.
No commits yetThis means that there haven’t been any changes or updates made to the repository yet. You haven’t created or saved any new versions of your project. The term “commit” will be introduced below.
nothing to commit (create/copy files and use "git add" to track)This indicates that there are no new changes to save or “commit” to the repository at this moment. Git is suggesting that if you want to start tracking changes, you should create or copy some files into the repository’s directory and then use the git add command to tell Git to start keeping track of those files. Once you’ve added files with git add, you can then commit those changes to save them in your project’s history (for more details, see below).
As you can see git status gives you an overview, which files Git is tracking for you. The git status command is helpful for understanding the current state of your Git repository and we recommend to use it frequently, especially before adding or committing changes in files to the Git history (see below for more details).
git status flags
-s: Provides a more compact and simplified output, showing only the file status in a short format.
-b: Includes information about the branch you are currently on along with the status.
-u: Shows untracked files in the output.
-uno: Suppresses the display of untracked files.
-v: Provides more detailed information, including additional status information about ignored files.
You can use these flags in combination. For example, git status -s -b will display a short and concise output along with the branch information.
In the next step, please create an empty text file within your repository 6.
Code
touch filename.txtYou can also use any other method or application for creating files.
Even though we are using Git from the command line, this does not mean that we have to do everything else from the command line as well. No matter if you are working on simple text files, analysis code, research data, or anything else in your Git repository, you can use any application you want. In the chapters on command line and setup, you learned a few ways to edit text files directly from the command line. While you are free to edit your files this way, it is absolutely not necessary just because we are using Git from the command line. More concretely, you can edit your files with any program you like and then go to the Terminal only to execute Git commands.
After you initialized a Git repository and added a file, you can use git status to receive the current file tracking status from Git again. This time, you should see an output similar to the following:
Output
On branch main

No commits yet

Untracked files:
  (use "git add <file>..." to include in what will be committed)

  filename.txt

nothing added to commit but untracked files present (use "git add" to track)
Git has noticed that you added a file to the repository and lists this file as an untracked file, meaning that it is not yet tracked by Git. Git also tells you what you can do about this, specifically using “git add <file>…” to include it in what will be committed.
We will now introduce central concepts of Git that might not be super intuitive if you learn about them for the first time, so read carefully. After initializing a folder with Git, it’s capable of recording changes in your files, but it won’t do so automatically. In Git, the process of saving changes involves two steps: the staging area and commits.
The staging area is like a preparation area where you gather and organize your changes before saving them as a snapshot. You can choose which changes to include in a snapshot by adding them to the staging area using git add. Once you are happy with the changes in the staging area, you create a commit with git commit.
A commit is like taking a snapshot of your project at a specific moment, capturing all changes in the staging area and saving them as a new version of your project. Commits serve as milestones to track your project’s progress and allow you to revert to previous versions if needed.
As further introduction to the basic workflow of Git you can check out the last two minutes of the YouTube video: Version control for reproducible research from BERD Academy, which explains the process very vividly.
You can use git add to place new or modified files in the staging area. The staging area acts as a space for gathering changes you plan to commit shortly. It bridges between your modified files and the next commit. For example, you can stage a specific file like this:
Code
git add filename.txtIf you use git status again, your file(s) should now show up under “Changes to be committed”.
Output
On branch main

No commits yet

Changes to be committed:
  (use "git rm --cached <file>..." to unstage)
    new file:   filename.txt
Your change to the file (or the addition of it to the project directory) is now staged.
Especially for existing project folders that have a lot of files in them, be careful when you stage and / or commit all files in the project directory. Git might start to track files that you are actually not interested in tracking or even sensitive files that should not be tracked by Git at all. We recommend to use git status frequently to check which files are in the staging area and will therefore be added to the next commit.
Especially if you have many files, you don’t have to add every file one by one, but you can simply use the -A flag. This means if you want to stage every file in your project for preparation of your next commit, you can use:
Code
git add -AAs an alternative, this command will also stage all changes:
Code
git add .To remove a file from the staging area in Git (without deleting the actual file), use the following command:
Code
git restore --staged <filename>This command unstages the file, moving it from the staging area back to your working directory. The changes in the file will still be present, but they won’t be included in the next commit until you stage it again.
git add flags
-A: Adds all changes, including modifications, deletions, and new files, in the entire working tree.
-u: Adds modifications and deletions, but not new files.
--ignore-errors: Ignores errors when adding files, allowing the command to continue even if some files cannot be added.
In RStudio, you can use the built-in Git interface to stage your changes without using the command line:
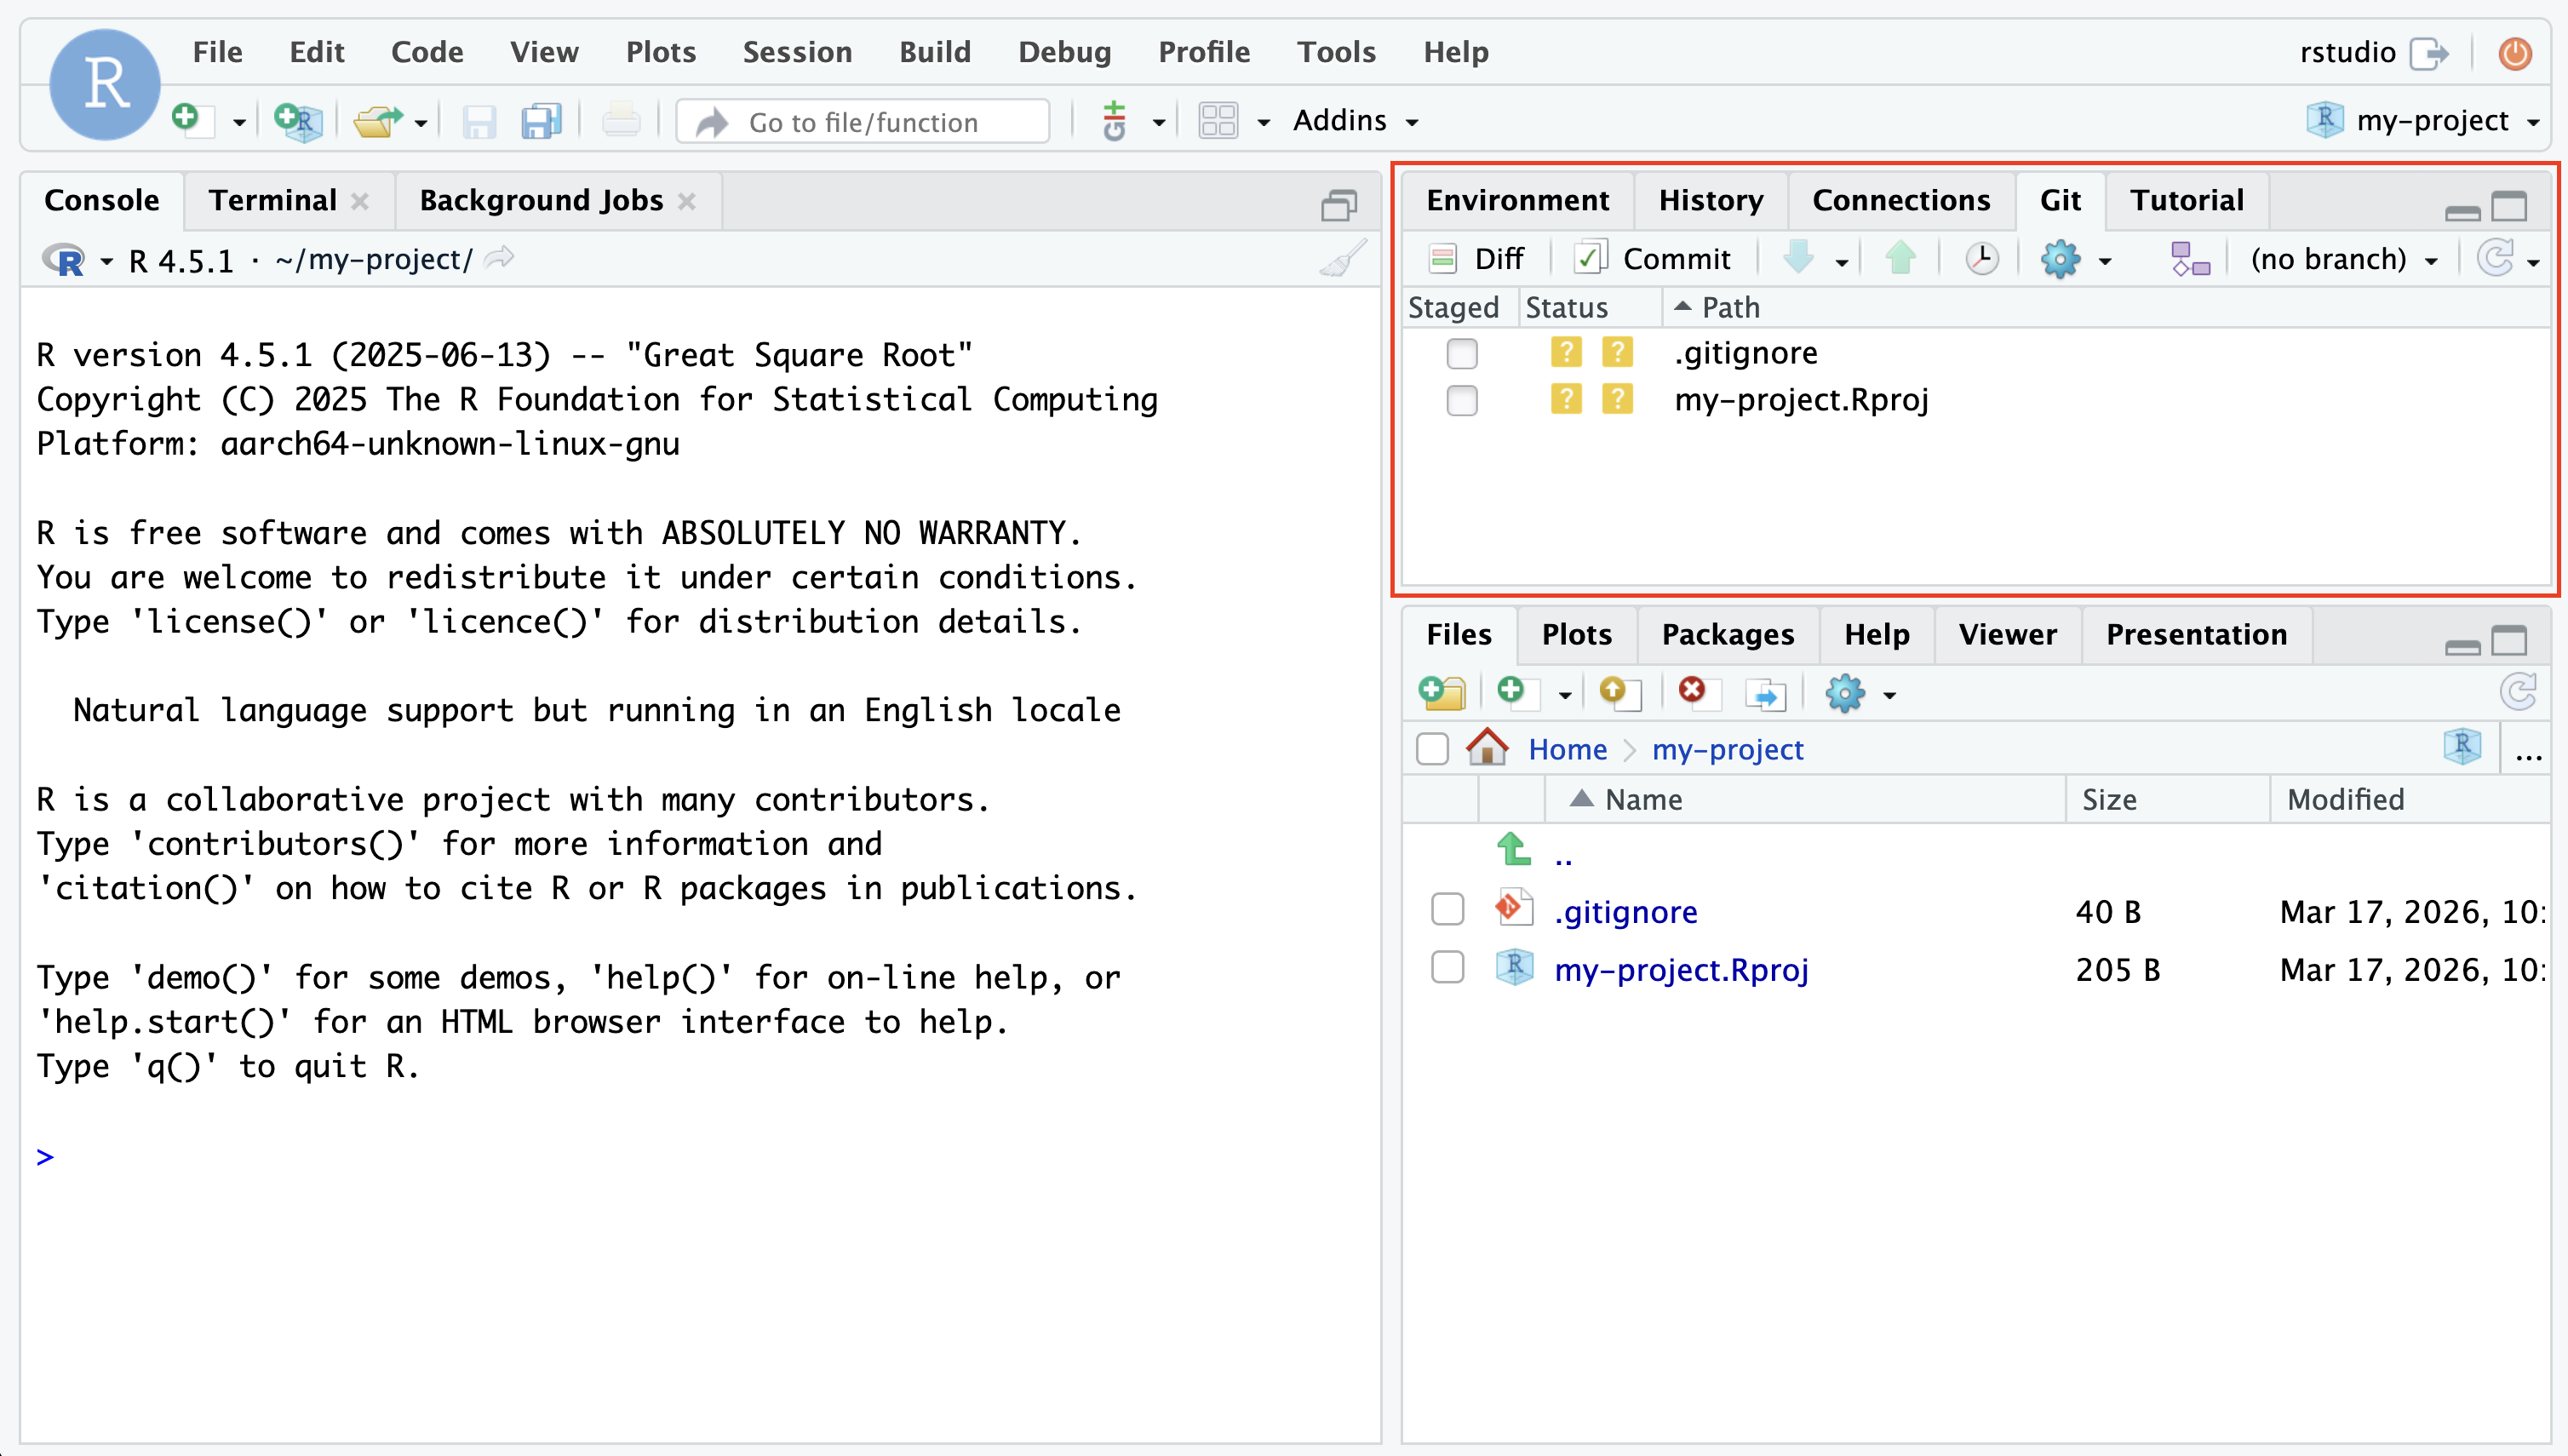
View changed files: Under the Git tab, you will see a list of files that have been changed or are new. These are equivalent to the files that you would see if you ran git status in the command line.
Stage specific files: To stage a specific file, check the box next to the file you want to stage. This action is equivalent to running git add filename.txt in the command line. The files you check are now in the staging area and ready to be committed.
Now that the changes to your file(s) are staged, you are ready to create a commit.
In simple terms, a commit in Git is like taking a snapshot of your project at a specific moment in time. It’s a way to save the changes you’ve made to your files. When you make a commit, you’re saying, “I want to remember what my project looks like right now”. Each commit in Git includes a record of the changes you’ve made, a description of what you did, and a unique identifier. Commits are like milestones in your project’s history, and they allow you to keep track of all the different versions of your work over time. You can go back to any commit to see what your project looked like at that point or even undo changes if needed. Commits help you manage and document the history of your project.
To create a commit, use the git commit command followed by the flag -m and a commit message in quotes that describes the changes you made. The commit message should be short yet informative, providing enough detail to understand the purpose of the commit. If you just use git commit without adding a commit massage, the text editor of your choosing, opens up and lets you type in a commit message.
Code
git commit -m "Add filename.txt file"You should see output similar to the following:
Output
[main (root-commit) e9ea807] Add filename.txt file
 1 file changed, 0 insertions(+), 0 deletions(-)
 create mode 100644 filename.txt
Congratulations! You have successfully created your first commit in the Git repository! 🎉
Commits are the core elements of version control and the “commit history” of your Git repository. They allow you to track the history of your project and easily revert changes if needed. You can use the same workflow of git add and git commit for every file you add or make changes in.
In this situation, you command line probably looks like one of these examples:
Output
echo "Hello World
>
>
>
Output
git commit -m "Add filename.txt
>
>
>
You can try one of the following solutions:
".You can also create commits using the Git Interface in RStudio:
Stage your changes: Before committing, make sure you have staged the changes you want to include in the commit. You can do this by checking the boxes next to the files in the “Git” tab, as explained in the previous section.
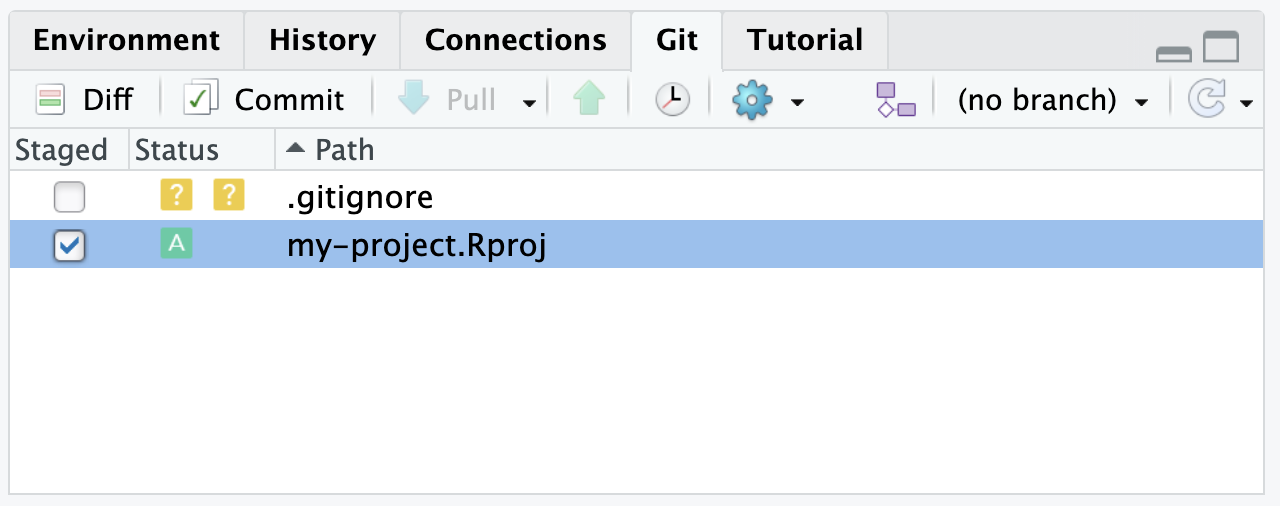
Open the commit tab: Once you have staged your change(s), click the “Commit” button on top of the Git tab. This will open a new window where you can enter your commit message.
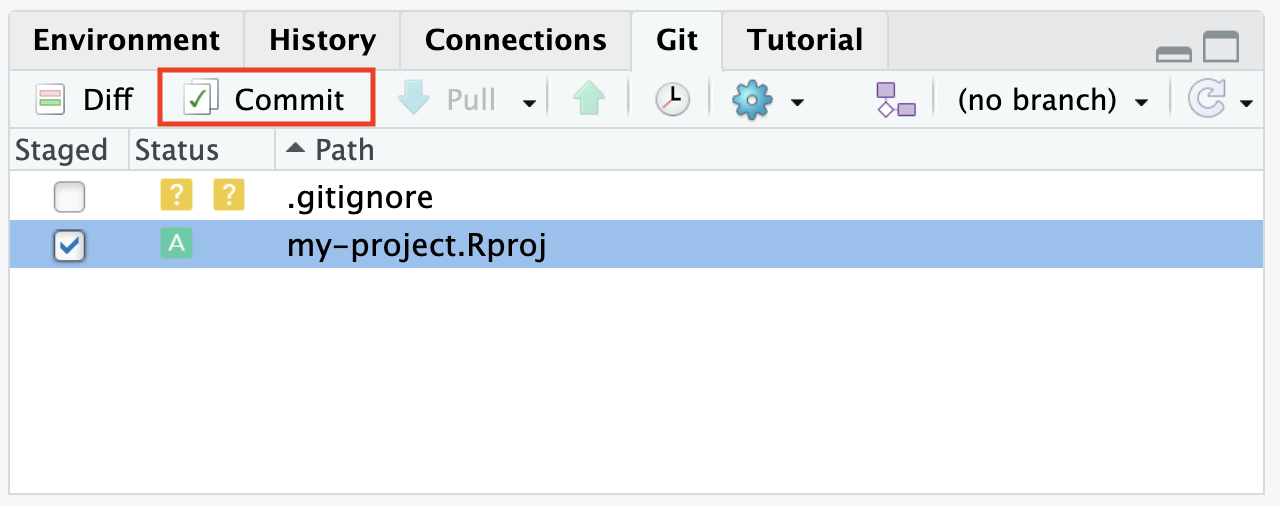
Review the staged changes: Below the commit message box, you will see a list of the changes that are staged for the commit. You can review these changes to make sure everything you want to commit is included.
Enter a commit message: In the commit dialogue window, you will see a text box where you can type your commit message. The commit message should be short yet informative, providing enough detail to understand the purpose of the commit. For example, you might type: Add R Project file or Add filename.txt.
Create the commit: After entering your commit message and reviewing the staged changes, click the “Commit” button at the bottom of the commit dialog window. This will create the commit with the specified message.
View the output: After committing, you will see output in the Git tab similar to the following:
Output
[main (root-commit) e9ea807] Add filename.txt file
1 file changed, 0 insertions(+), 0 deletions(-)
create mode 100644 filename.txt
You have now successfully created a commit in the Git repository in RStudio!
Although it’s not required, it can be a good idea to add a more thorough description to the commit, in addition to the (shorter) commit message. While the commit message is usually a single short (less than 50 character) line summarizing the change, a more thorough description can be used to add more background information or helpful links that may help to understand the changes of the commit.
To add an additional description directly in the command line, add an extra -m after the commit message, followed by the description in quotes:
Code
git commit -m "Message" -m "Description"git commit flags
-m git commit -m "Fix typo" allows you to provide a short commit message directly in the command.
-a or --all: Automatically stages all modified and deleted files before committing. This skips the separate git add step.
-v or --verbose: Provides a detailed output, showing the diff of the changes being committed.
-e or --edit: Opens the commit message editor, allowing you to edit the commit message before finalizing the commit.
--amend: Modifies the previous commit. It allows you to add new changes to the previous commit or modify its commit message.
| Command | Description |
|---|---|
git init |
Initializes a folder as a Git repository |
git status |
Shows Git tracking status of files in the repository |
git add |
Adds file(s) to the staging area |
git commit |
Commits staged files |
git commit -m "commit message" |
Commits staged files with a commit message |
We would like to express our gratitude to the following resources, which have been essential in shaping this chapter. We recommend these references for further reading:
| Authors | Title | Website | License | Source |
|---|---|---|---|---|
| The Turing Way Community (2022) | The Turing Way: A handbook for reproducible, ethical and collaborative research | CC BY 4.0 | ||
| Millman et al. (2018) | Teaching Computational Reproducibility for Neuroimaging | CC BY 4.0. Website: | ||
| McBain (2019) | Git for Scientists | CC BY-SA 4.0 | ||
| Bryan (2023) | Happy Git and GitHub for the useR | CC BY-NC 4.0 |