Code
git statusThis chapter introduces more advanced Git commands for working with branches. In particular, this chapter will cover stashing, alternatives to standard merging like cherry-picking and rebasing, as well as visualization techniques for branches.
git stash is a valuable command in Git that allows you to save your current changes temporarily without committing them. This is useful when you need to switch branches or work on something else without creating a commit for unfinished work. For example, when you’re working on a feature and you need to switch to a different task quickly or your work gets interrupted unexpectedly, you may not want to commit your unfinished changes. When you run git stash, Git stores the changes in your working directory and staged changes in a special stash commit. The working directory is then reverted to the last committed state, providing a clean slate for your next task.
To demonstrate the usefulness of git stash, you can edit one or more files in your repository, stage (or don’t stage) your changes, but don’t commit them. Now use git status to look at the current state of your working directory.
Code
git statusYou should get an output similar to:
Output
Changes to be committed:
  (use "git reset HEAD <file>..." to unstage)

    modified:   example.html

Changes not staged for commit:
  (use "git add <file>..." to update what will be committed)
  (use "git checkout -- <file>..." to discard changes in working directory)

    modified:   example.txt
In this example, there are changes on two tracked files, one staged and one not staged, that we want to stash. Just like when committing, it is possible to add a message when stashing using the -m flag. It makes sense to add a message because it serves as a reminder of what changes were stashed, making it easier to identify the purpose of the stash when you later list or apply stashes.
Code
git stash -m "feature X WIP"You should get an output similar to:
Output
Saved working directory and index state On feature: "feature X WIP"You can now use git status to look at your working directory again and should see an output similar to:
Output
On branch main
nothing to commit, working directory clean
Now you can switch branches and work on something else or stop working on the project altogether.
To look at all your stored stashes, you can use git stash list:
Code
git stash listYou should get an output similar to:
Output
stash@{0}: On feature: feature X WIPAll of your stored stashes should show up, with the most recent on top. Every stash should have a number, applied chronologically.
If you want to reapply your stashed changes, you can use git stash apply. This command automatically applies your latest stash. You can also specify a stored stash, for example git stash apply stash@{0}
Code
git stash apply stash@{0}You should get an output similar to:
Output
On branch main
Changes not staged for commit:
  (use "git add <file>.. ." to update what will be committed)
  (use "git checkout -- <file>..." to discard changes in working directory)

    modified:   example.html
    modified:   example.txt

no changes added to commit (use "git add" and/or "git commit -a")
The changes made in your stored stashed are now applied again in your working directory. Note that already staged files are not automatically staged again.
git stash flags
git stash -m "message": Save your changes in a stash with a message.
git stash apply stash@{n}: Apply the changes from the specified stash (identified by its index n) to your working directory.
git stash pop stash@{n}: Apply the changes from the specified stash (identified by its index n) to your working directory and remove the stash from the stash list.
git stash list: List all the stashes you have created, showing their reference numbers and stash messages.
git stash drop stash@{n}: Remove the specified stash (identified by its index n) from the stash list.
git stash branch <branchname>: Create a new branch named <branchname> from the commit where you originally stashed your changes and apply the stash to the new branch.
git stash show stash@{n}: Show the diff of the changes stored in the specified stash (identified by its index n).
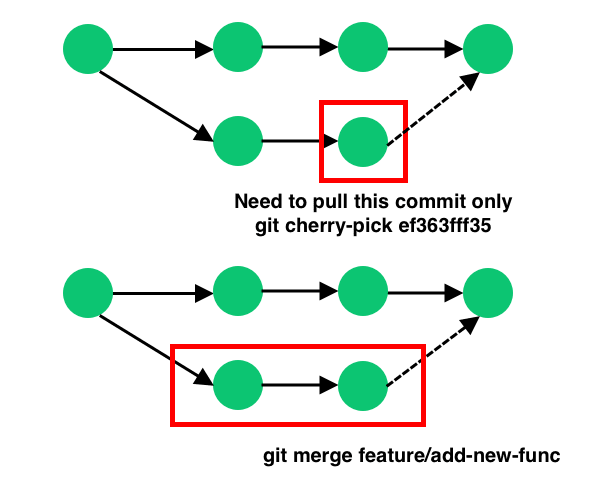
git cherry-pick allows you to apply the changes from a specific commit from one branch to another. This means, you can pick and apply specific commits to your current branch without merging the entire branch. This can be useful when you only want to bring in specific changes from another branch into your current branch, in contrast to merging all commits of a branch, as visualized in Figure 8.1. You will need the hash of the commit you want to “cherry-pick” and then use the command:
Code
git cherry-pick <commithash>Again, you might have to resolve merge conflicts. The default commit message will be:
Output
Cherry-pick commit <commit-hash>
This commit was cherry-picked from <source-branch> at <source-commit-hash>
git cherry-pick flags
-n or --no commit: Prevents Git from automatically creating a new commit after cherry-picking. It stages the changes, allowing you to make additional modifications or review them before committing.
-e or --edit: Opens the default text editor to edit the commit message of the new cherry-picked commit. Useful when you want to provide a custom message for the cherry-picked commit.
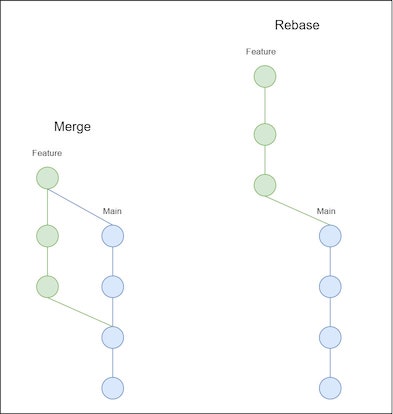
git rebase is a different way compared to a standard merge to integrate changes from one branch into another. For example, when you rebase the feature branch onto the main branch you “rearrange” the commits. It’s like taking your changes, applying them on top of the latest main branch, and making it all look like a smooth line. The new commits you made in the feature branch are still there, but they appear as if they were created after the latest changes in the main branch. It’s like picking up your changes and placing them on the latest code, resulting in a linear history. For an illustration, see Figure 8.2.
Code
git rebase mainHowever, you should use rebase with caution when collaborating with others, as it can rewrite commit history and create conflicts for team members.

git rebase flags
--interactive or -i: Start an interactive rebase, allowing you to edit, reorder, or squash commits interactively.
--continue: Continue the rebase after resolving conflicts or editing commits during an interactive rebase.
--abort: Abort the current rebase operation and return the branch to its original state before the rebase.
--skip: Skip the current commit during an interactive rebase.
-p or --preserve-merges: Preserve merge commits during the rebase.
--autosquash: Automatically squash commits marked with “squash” or “fixup” in their commit message during an interactive rebase.
Git also offers an option for rudimentary visualization of branches inside the command line. For that you can use git log (introduced in the previous chapter on Git Essentials) with four flags:
Code
git log --oneline --graph --all --decorateThe flags to this git log command do the following:
--oneline: Displays each commit on a single line, providing a concise overview of the commit history.--graph: Draws a text-based graph showing the relationships between commits and branches.--all: Includes commits from all branches (both local and remote).--decorate: Adds labels to commits showing which branches or tags they belong to.The output might look something like this:
Output
* f5a433d (HEAD -> feature) Add new feature
* 1b672d3 Merge branch 'main' into feature
|\
| * d5a7342 (main) Update README
| * 3f672c4 Initial commit
* 7a1d5d1 Fix typo in feature
In this example, the graph shows that the feature branch has diverged from the main branch and is currently ahead of main by two commits. The asterisk (*) represents commits, while the lines (|) show the relationships between these commits and branches. The \ indicates that two branches (in this case, main and feature) have joined after being separate.
Creating an alias for this visualization command can be a good idea, as it will likely be used often, and it’s easy to forget to add some flags. After running the command below, you can simply use git graph instead of git log --oneline --graph --all --decorate for the same result 1.
Code
git config --global alias.graph "log --oneline --graph --all --decorate"This alias was adopted from CodeRefinery 2024.↩︎