Code
git configIn this chapter, we will set up and configure Git!
An RStudio project is a folder that contains all files related to your analysis, such as code, data, and documentation. It serves as a complete research object, making your work organized and reproducible.
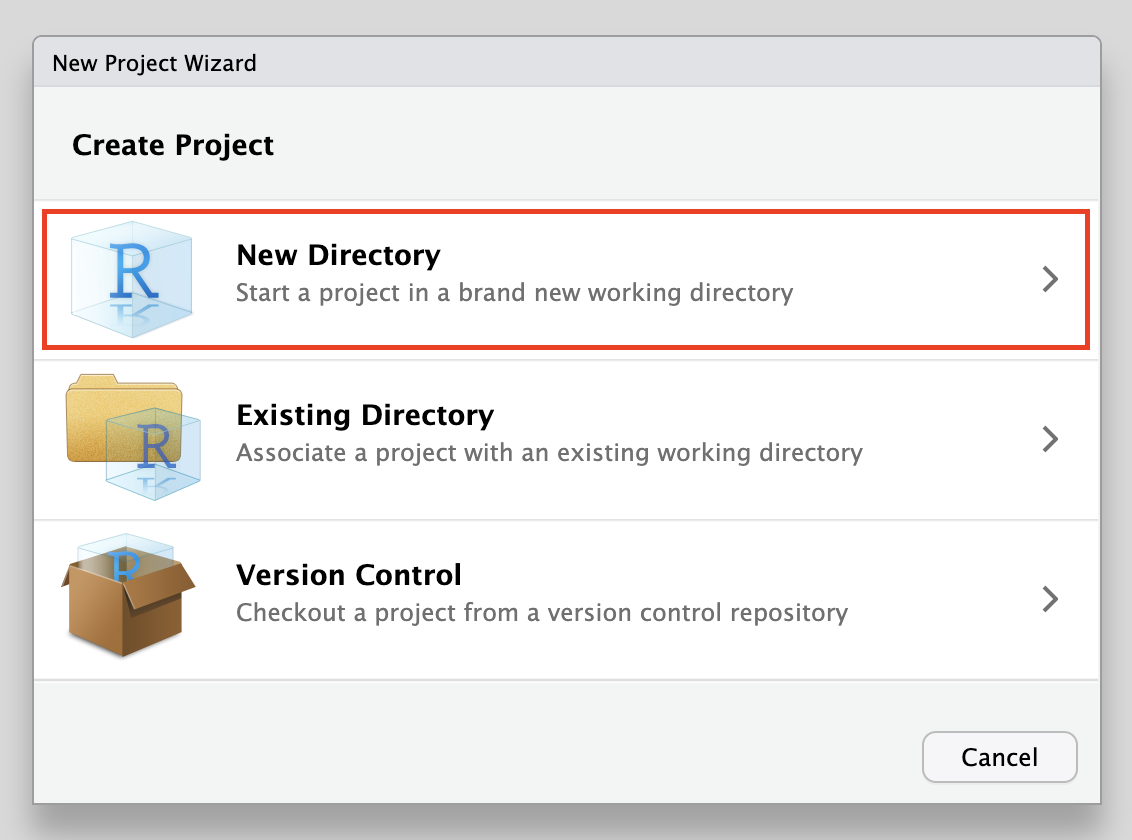
To create a new project in RStudio:
Go to File → New Project → New Directory.
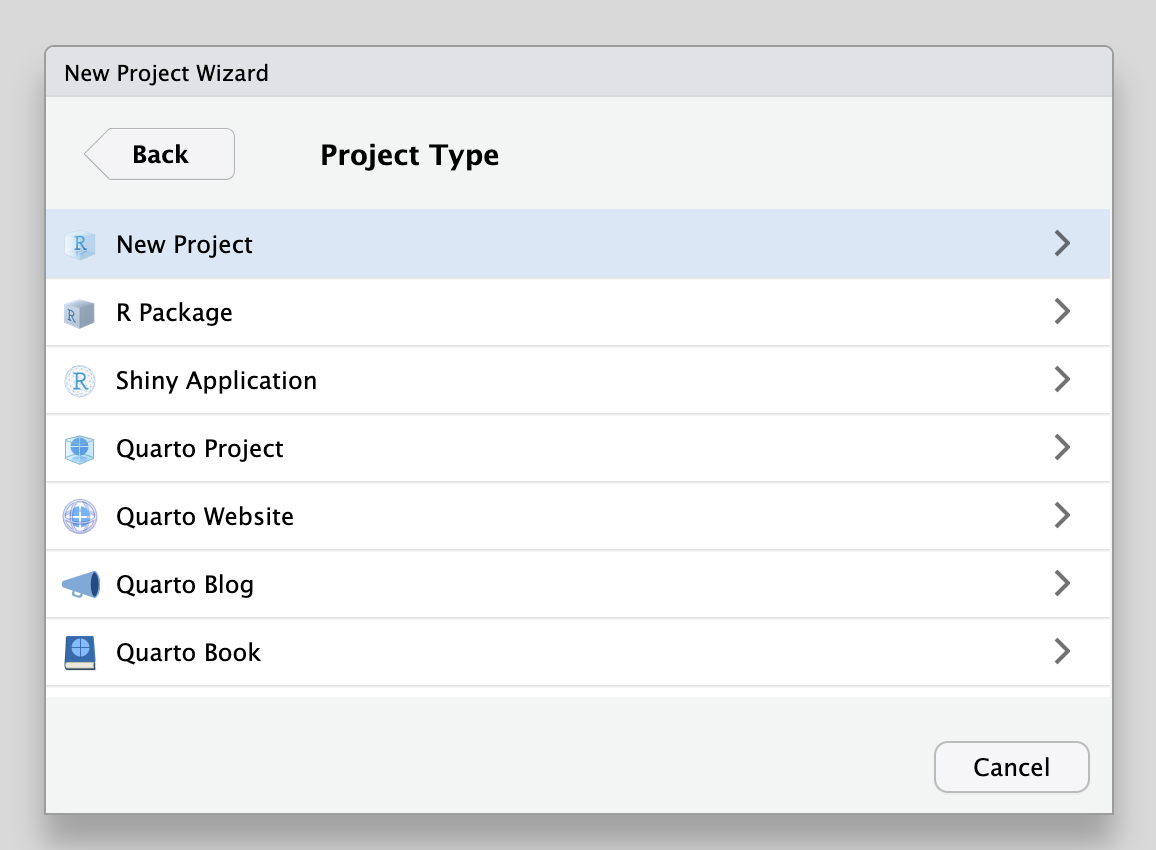
In the Project Type screen, select New Project.
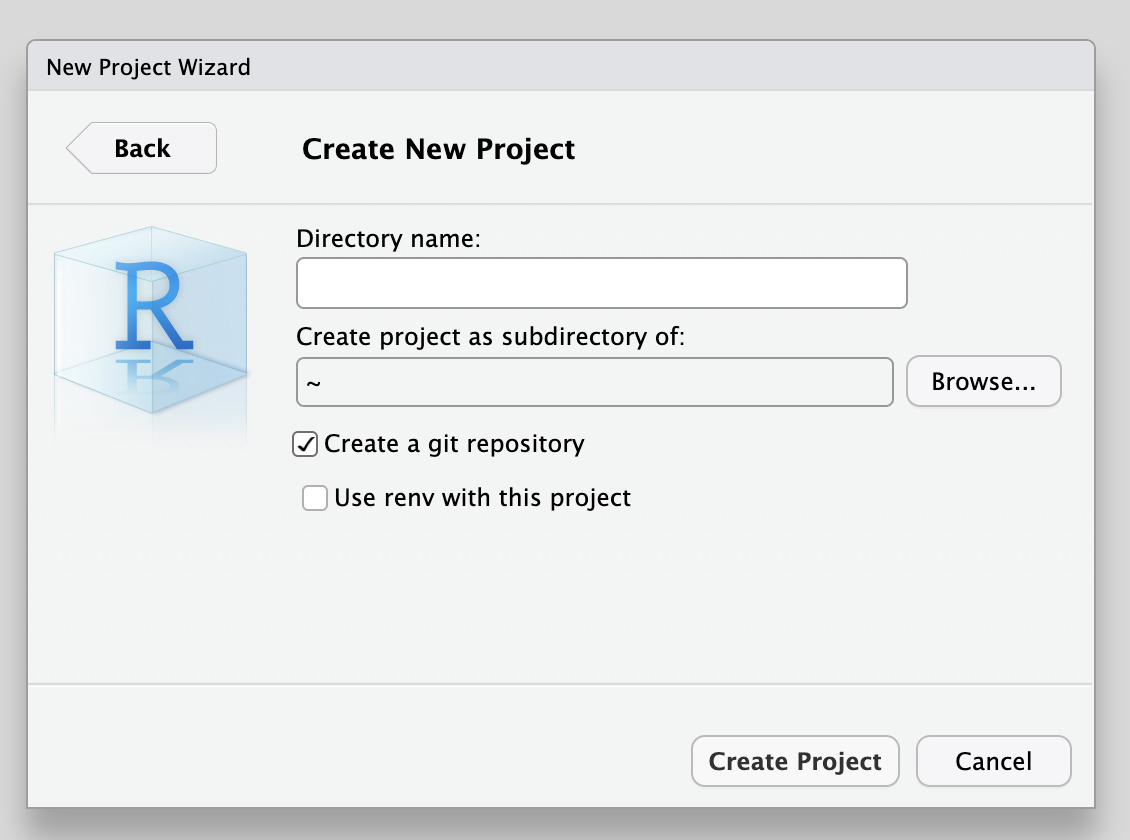
In the Create New Project screen, enter a project name (e.g., my-project). Make sure Create a git repository is checked. Click Create Project.
RStudio will create a new folder for your project and set R’s working directory to that location. You will see two files in the new project folder:
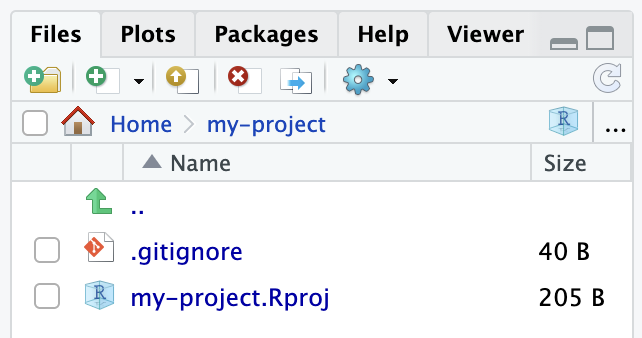
.gitignore configuration for more details.Don’t worry about these files for now.
Once you installed Git, it’s time to set it up. We will use the the command line to set up and configure Git. The git config command is used to get and set configuration settings. It allows you to customize Git according to your preferences and requirements. This chapter will focus on the most important and necessary configurations. To look at all the different configuration options, enter git config into the command line:
Code
git configIn Git, configuration values can be stored at three different configuration levels: the system, global, and local level. Find out more in Tip 4.1 how you can set configuration values at each level.
Git configuration values can be stored at three different configuration levels:
System-level configuration: This level applies configuration values to every user on the system and all their repositories. To read or write configuration values at this level, you need administrative privileges. To set a system-level configuration, use the following command syntax:
Code
git config --system <key> <value>Global-level or user-level configuration: This level is specific to an individual user. Configuration values set at this level will be applied to all repositories owned by the user. To set a global-level configuration, use the following command syntax:
Code
git config --global <key> <value>Repository-level configuration: This level is specific to a particular Git repository. The configuration values set at this level override values set at the system-level and user-level configurations for that specific repository. By default, Git reads from and writes to this file when you use the git config command without any additional options.
Code
git config --local <key> <value>Keep in mind that when you set configurations at different levels, Git looks for the configuration from the most specific level to the least specific (local > global > system). The configuration set at the local level will override the configurations set at the global and system levels for that particular repository.
By default, copy and pasting is disabled in Git Bash for Windows. To enable it, follow these steps:
Before you start using Git, it’s important to set your username and email address. This information is crucial because Git uses it to identify the author of each change you track with Git. By associating your changes with your username and email, it allows others (including future you) to see who made the changes which facilitates transparency and collaboration within a project. You will be able to connect Git to remote repositories like GitHub using this email address. So it makes sense to set your email address to the one you use (or will use) to create a GitHub account.
Your username will be attached to the changes you track with Git, so choose something that is meaningful and informative for others and yourself in the future. After all, one main purpose of Git is to be able to track of who made which changes and when. This can help a lot in the future when you need to figure out who to talk to about a particular change. Your username can be your real name, your GitHub username, or something informative about you. You can change your username and email address for different projects by setting them up on the respective configuration level (for details, see Tip 4.1). This can be useful if you have a work related and a private GitHub account or work for several companies at the same time.
When you set your username and email address in Git, keep in mind that this information about you will be stored in the Git history and associated with every change you make. This means your username and email could be visible to anyone who has access to the repository, potentially revealing personal details such as your first and last name.
If privacy is a concern, you might consider using a pseudonym or a dedicated email address for Git, especially if you are contributing to public repositories. For example, GitHub allows you to use a noreply email address associated with your GitHub account to keep your personal email private.
Always be mindful of the information you share, as it can be difficult to remove or change once it’s added to a Git repository.
Setting your username and email address is a one-time setup process on a new computer, but you can always update them later, if needed. To perform this configuration using the command line, use the following command:
Git uses a concept called “branches” to allow working on different versions of the same project. Branches will be introduced in a later chapter of this book. For now, you can think of branches as parallel versions of your project’s contents.
On most installations of Git, by default, the name “master” is used for the initial branch when creating a new Git repository. However, there has been a growing movement to transition to using “main” as the default branch name instead. One of the main motivations behind this change is to promote inclusivity and remove offensive terminology from the default Git workflow (you can read more about the reasons here or here). To configure the default branch name to “main” in Git, you can use the following command:
Code
git config --global init.defaultBranch mainYou can verify if your configurations were set correctly using the following command:
Code
git config --listThis should create a long output list, in which you should find your configurations, for example:
Output
user.name=Jane Doe
user.email=jane@example.com
init.defaultbranch=mainThe --help option in Git is a command that provides you with access to the built-in Git documentation and help resources. When you run a Git command followed by --help, Git displays information about that command, including its usage, available options, and a brief description of its functionality.
For example, the following command will open up a browser in the command line containing information about the git config command.
Code
git config --helpTo quit the browser use q.
While the git config --help command provides extensive documentation and information about Git commands, it is arguably not the most beginner-friendly resource. Platforms like Stack Overflow provide help for many questions around using Git.
Sometimes Git might open up a text editor inside the command line, and it can be annoying if you end up in an editor that you don’t like or don’t know how to use. The standard text editor on macOS and “Git for Windows” is called Vim (or Vi), which has a (perhaps questionable) popularity for being difficult to use. You can find more information about the challenges of using Vim (and some funny memes) here. To check out which text editor Git is using, you can use:
Code
git config --get core.editorIf you have not changed your text editor yet, the output should be empty. This means that Git is using the command line’s default editor, which should be Vim if you are using macOS or “Git for Windows”. To make sure, you can use:
Code
git var GIT_EDITORIf the output is vim or vi, your system’s default editor is indeed Vim / Vi. Vim is an improved version of Vi, but there are virtually no differences that are relevant for learning Git or the scope of this book. In this situation, you can either pick up on the basics of Vim (see below) or simply change the text editor. Also note that, depending on your workflow, you will typically not have to use a text editor in the command line a lot. For beginners, we recommend to become familiar with the basics of your system’s default text editor (in most cases, Vim) to be able to perform basic operations (at least, how to exit it) when interacting with Git.
To start Vim, open the command line and type vim followed by the filename of the file that you want to edit (for example, vim file.txt). In Vim, you have two main modes: Insert mode for typing your text and Normal mode for navigation and command execution. Vim will always start in Normal mode, which can be confusing. The command line will probably look like this:
Output
~
~
~
To switch from Normal mode to Insert mode, press I on the keyboard. You can see that -- INSERT -- appears at the bottom of the command line window. This should look like this:
Output
~
~
~
-- INSERT --
You can now start writing any text into the file. This could look like this:
Output
Cool, I am using Vim!
~
~
~
-- INSERT --vim without providing a filename like filename.txt? What do I do now?
If you entered vim into the command line without providing a filename, a welcome screen similar to the following will appear:
Output
~
~                              VIM - Vi IMproved
~
~                               version 9.0.2136
~                           by Bram Moolenaar et al.
~                 Vim is open source and freely distributable
~
~                        Help poor children in Uganda!
~                type  :help iccf<Enter>       for information
~
~                type  :q<Enter>               to exit
~                type  :help<Enter>  or  <F1>  for on-line help
~                type  :help version9<Enter>   for version info
~
To make things easy: You can exit Vim again by pressing Esc, then entering :q! and pressing Enter.
When you’re done writing, here’s how to save and exit Vim:
:w (then press Enter):q (and press Enter).You can also combine commands in Vim, so you can use :wq to save your changes and exit Vim with just one command (don’t forget to hit Enter). This will look like this:
Output
Cool, I am using Vim!
~
~
~
:wqE37: No write since last change (add ! to override)
This error might occur if you made changes to a file using Vim and tried to exit Vim using :q but didn’t use :w before to save the changes. Vim therefore warns you that you didn’t “write since last change”:
Output
~
~
~
E37: No write since last change (add ! to override)
You can now decide to either (1) save the change using :w then quit using :q (or combine with :wq) or, as Vim suggests, override or discard the changes using :q!.
Output
~
~
~
:q!
For a more detailed and interactive tutorial of Vim, you can check out openvim.com. For more information about common Vim commands, also see the box below.
To navigate through the text in Normal mode without using the arrow keys, you can use h to move left, j to move down, k to move up, and l to move right. If you need to delete a character in Normal mode, simply press x. This will remove the character under the cursor. To delete an entire line, use dd.
Undoing changes is also straightforward in Vim. Press u in Normal mode to undo the last action, and Ctrl + r to redo an action if you’ve undone too much.
Sometimes, you might want to search for a specific word or phrase in your file. To do this, press / followed by the word or phrase you’re looking for, and then press Enter. Vim will jump to the first instance of that text. Press n to find the next instance or N to find the previous instance.
To replace one word with another throughout the entire file, you can use the substitute command: :%s/old/new/g. This command will replace all occurrences of "old" with "new". If you want to confirm each replacement, add a c at the end: :%s/old/new/gc.
For editing multiple lines at once, you can enter Visual mode by pressing v in Normal mode. Move the cursor to select multiple lines or characters, then you can perform operations on that selection, like deleting with d or copying with y. To paste the copied or cut text, use p.
To open a new file or switch between multiple files in Vim, use the :e filename command. To list all open files (buffers) and switch between them, use :ls to list and :b number to switch, where number is the buffer number.
If you want to change the standard text editor to one that you are more comfortable with, there a lot of alternatives like Nano, Visual Studio Code or Notepad++. If you have decided to use a different text editor you can use the following command (replace "EDITOR_NAME" with the name of your preferred text editor):
Code
1git config --global core.editor "EDITOR_NAME""EDITOR_NAME" with the name if your preferred text editor.
For example, to set Nano as the default text editor, use the following command:
Code
git config --global core.editor "nano"More information about associating text editors with Git, for example Visual Studio Code, can be found in the GitHub documentation.
From now on, when Git requires you to interact with a text editor, it will open the one that you have set. If you ever want to change your Git editor in the future, you can repeat the above steps and specify the new editor command or path.
If you want to undo a configuration setting, you can use the --unset in the git config command. For example, to unset the global configuration of your preferred text editor (core.editor) you can use the following command:
Code
git config --global --unset core.editor.gitconfig fileThe configurations that you apply to Git using the git config command are stored in a configuration file called .gitconfig that can usually be found in the user’s home directory.
.gitconfig with one command from the command line.
As always, there are multiple ways how to view the contents of .gitconfig with one command from the command line. Here is one example using the cat command in combination with the ~:
Code
cat ~/.gitconfigThis command will result in an output similar to this:
Output
[user]
    email = jane@example.com
    name = Jane Doe
[init]
    defaultBranch = main
You can manually edit the .gitconfig file to customize your Git environment, but it’s often more convenient to use Git commands like git config to manage these settings.
Aliases are customizable shortcuts for Git commands. When you have to retype the same commands over and over again, aliases can help save time, reduce frustration, and avoid typos in more complex commands. Any name can be chosen for an alias. They can be set at different configuration levels and thus either remain the same across all your repositories or vary between them. 1 Aliases are stored in the .gitconfig file and can be changed directly there or by using git config.
For example, to set the command git ci as an alias for git commit at the global configuration level, use the following:
Code
git config --global alias.ci "commit"Both git ci and git commit can now be used interchangeably, and if needed, more aliases can be set, even for the same command.
Check out the list of aliases used by instructors from CodeRefinery (2024) for inspiration on what kinds of aliases you could set in your Git configuration.
Especially if you’re new to Git (though not only then!), you might worry that something will go terribly wrong, that you’ll lose files beyond recovery or even “break your computer”. While we can’t guarantee that this will never happen (if you try hard enough, it’s always possible to break things), it’s quite unlikely that anything serious will go wrong. In this section, we’ve collected tips and tricks to help make your Git journey as smooth as possible.
In the next chapter, you will take your first steps with Git. This will involve creating your first Git repository in a folder on your computer. It is then possible to track changes in the files in that folder.
We strongly recommend that you don’t create a Git repository in your home directory! Otherwise, you might start tracking changes in all files in your home directory, which usually means all the files that you have saved under your user name, including applications and system files. Always remember that you need to navigate to the folder first where you want to create a new Git repository or work on an existing one 2.
To prevent accidentally creating a Git repository in your home directory, you can run the following command:
Code
touch ~/.gitThis command creates an empty file called .git in your home directory. The path ~/ specifies the path to your home directory. If you then run the git init command to initialize a new Git repository (find out more about this in the next chapter), the following (desired) error will appear and no Git repository is created in your home directory:
Output
fatal: invalid gitfile format: /Users/user/.gitThis way, you are protected from accidentally creating a Git repository in your home directory.
When you implement this guardrail but haven’t created your first Git repository yet, commands like git config will stop working as expected. To prevent this, we recommend the following procedure:
git config to configure Git.You can also set up this guardrail after you created your first Git repository in a suitable location. There is no required order, we only want to make sure Git works as expected and prevent you from creating a Git repository in your home directory.
Note that some applications on your computer (like PsychoPy and DataLad) will scan your directory hierarchy for existing Git repositories and display an error message when they detect the empty .git file you may have set up as a guardrail. In this situation, we recommend simply removing the empty .git file in your home directory (and possibly re-creating it after you set up your project in the other application). Remember that this is intended as a helpful guardrail and provides extra protection against accidentally creating a Git repository in your home directory. However, if it proves more annoying than helpful, feel free to remove it.
We would like to express our gratitude to the following resources, which have been essential in shaping this chapter. We recommend these references for further reading:
| Authors | Title | Website | License | Source |
|---|---|---|---|---|
| Chacon and Straub (2014) | Pro Git | CC BY-NC | ||
| Capes et al. (2023) | swcarpentry/shell-novice: Software Carpentry: the UNIX shell | CC BY 4.0 | ||
| Koziar et al. (2023) | Software Carpentry: Version Control with Git | CC BY 4.0 | ||
| Bryan (2023) | Happy Git and GitHub for the useR | CC BY-NC 4.0 | ||
| CodeRefinery (2024) | Introduction to Version Control with Git. Aliases and Configuration | CC BY 4.0 |
In this chapter, we have learned about the following commands:
| Command | Description |
|---|---|
git config |
Get an overview of Git config commands |
git config --global user.name "user.name" |
Sets Git username |
git config --global user.email "user.email" |
Sets Git email address |
git config --global core.editor "editorname" |
Sets Git text editor |
git config --global init.defaultBranch main |
Sets default branch name to main |
git config --list |
Views set Git configurations |