Code
1git tag v1.0- 1
-
v1.0is only an example. You can choose any other tag name.
Let’s dive into the world of Git tags and releases! We’ll cover everything from creating tags to managing versions, sharing tips for smooth collaboration and integration with Zenodo.
When submitting a scientific paper, it’s crucial to know exactly which version of your code was used to generate the results. By tagging the commit with a descriptive name (e.g., paper-submission-v1), you can easily refer back to the exact state of your code and data that produced the results in the submission. This ensures reproducibility and helps to quickly trace the source of your published findings.
When revising a paper based on reviewer feedback, it’s important to track what has changed between the original submission and the revised version. Tagging the first submission (e.g., submission-v1) and the revised version (e.g., revision-v1) allows you to easily compare the differences, ensuring that the revisions are clearly documented and traceable.
Releases represent specific versions of your repository, that you can package and share with a broader audience for download and usage. These releases are tied to specific Git tags, which act as markers for specific points in your repository’s history.
Here’s a step-by-step guide:
Go to the main page of your GitHub repository.
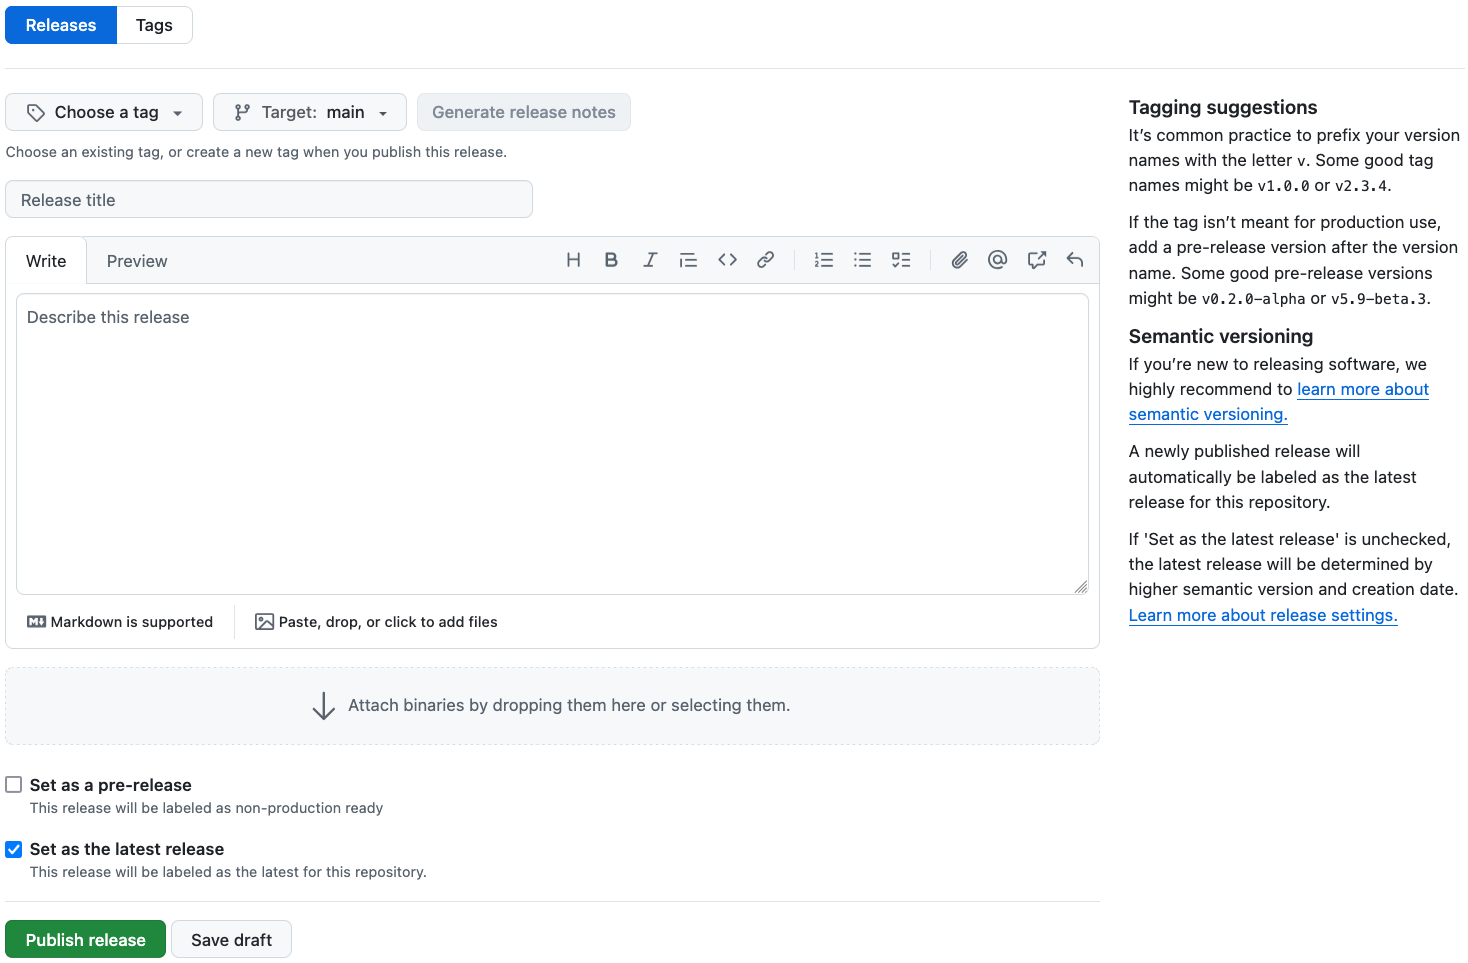
Click on “Create a new release” under “Releases” tab located on the right side of your repository page. Now, you should see a page, similar to Figure 11.1.
Choose an existing Git tag or create a new one. If you have created and pushed a tag, it should show up here. Enter the tag version in the “Choose a tag” field. Enter a meaningful title for your release. In the “Describe this release” field, provide release notes. This can include details about new features, bug fixes, and any other relevant information. If you have binary files, installers, or other assets related to the release, you can attach them by clicking on “Attach binaries by dropping them here or selecting them”.
If you’re creating a draft release, you can save it as a draft by clicking on the “Save draft” button. Draft releases are not visible to the public. If you’re ready to make the release public, click on the “Publish release” button.
That’s it! You’ve successfully created a GitHub release for your project! 🚀
After publishing the release, you and others can view it on the Releases page of your GitHub repository. It will include the release notes, associated Git tag, and any attached assets.
Zenodo is an open-access digital repository platform designed to preserve and share research outputs. It is operated by CERN (European Organization for Nuclear Research) and supported by the European Commission. Zenodo provides a platform for researchers across various disciplines to deposit, share, and archive their scholarly works, datasets, code, and other research outputs.
Zenodo can be integrated with version control systems like Git and platforms like GitHub. This integration allows for automated archiving of specific releases or tags from Git repositories. Zenodo assigns a Digital Object Identifier (DOI) to each record, including those linked to GitHub repositories, providing a permanent link for citation.
By linking your GitHub repository, you also ensure that your work is archived and accessible beyond the lifespan of GitHub. When you publish a research paper, journals increasingly require or encourage the deposition of associated data in a public repository. Uploading the contents of your GitHub repository to Zenodo ensures that your work is openly accessible and can be cited.
A Digital Object Identifier (DOI) is a unique alphanumeric string assigned to a digital document or resource to provide a permanent and stable link to it. DOIs are commonly used to identify and provide a persistent link to scholarly articles, research papers, books, datasets, and other types of digital content. The purpose of a DOI is to ensure that the content can be reliably located and accessed over time, even if the web address (URL) of the resource changes.
Key features of DOIs include:
Uniqueness: Each DOI is unique to a particular resource, ensuring that no two resources have the same identifier.
Persistence: DOIs are designed to remain unchanged, providing a persistent link to the resource even if it is moved or the URL changes.
Interoperability: DOIs are widely used in scholarly publishing and other sectors, making them interoperable across different systems and platforms.
Accessibility: DOIs are often associated with metadata that provides information about the resource, such as author, title, publisher, publication date, and more.
Citations: DOIs are commonly used in academic and scientific citations to provide a standardized and reliable reference to a specific resource.
DOIs are typically assigned and managed by registration agencies, such as CrossRef for scholarly content or DataCite for research data. Organizations and publishers assign DOIs to their digital content to enhance discoverability, citation tracking, and long-term accessibility.
Just experimenting? Use the Zenodo Sandbox rather than the “real” Zenodo!
To upload a Git repository to Zenodo, you first need to create a Zenodo account. On the Zenodo start page, you can click on “Sign Up” in the top right corner. Here you either can directly use your GitHub account to sign up, or sign up using your email (or other accounts) and link your GitHub account later on. To link your GitHub account, you can click on the arrow, next to your email, on the start page and select “GitHub”.
If you are just trying out how to upload a Git repository, we recommend to use the Zenodo Sandbox, to not create an unnecessary real DOI which is hard to delete. If you created an account on the regular Zenodo site before, you will have to create a new account to use the Zenodo Sandbox, since the accounts do not synchronize.
Note that you have to link your Zenodo account to GitHub and sync your repository before you create a new release on GitHub!
Again: First, link GitHub to Zenodo and sync your repository! Then create the release on GitHub.
To upload an older release, you have to download your repository as a .zip file from GitHub and uploading it manually at https://sandbox.zenodo.org/uploads/new
To upload a new release, visit the Zenodo GitHub settings. Here you should see all your uploaded repositories, with the option to sync them by selecting the “on” button. If you now create a release, as discussed earlier, it will show up and be associated with a DOI. Please note that if you have created a release before syncing your repository, the release will not show up. You can delete the GitHub release without deleting your tag and create a new release, which is then going to appear on Zenodo.
For a pictured guide on how to upload a GitHub repository to Zenodo, you check out this guide from the Code Refinery.
After you have created a release in your synced repo, a DOI badge should show up in your Zenodo GitHub settings next to the repository name. When you click on it there should be a section called Markdown with Markdown syntax below, for example:
[](https://sandbox.zenodo.org/doi/10.5072/zenodo.71301)You can copy and paste this syntax into your README.md file on GitHub to create a clickable DOI badge. This badge will then show up in your README.md file on GitHub as shown below. Now visitors of your GitHub repository only need to click on the badge to get to the release on Zenodo!
![]()
We would like to express our gratitude to the following resources, which have been essential in shaping this chapter. We recommend these references for further reading:
| Authors | Title | Website | License | Source |
|---|---|---|---|---|
| Chacon and Straub (2014) | Pro Git | CC BY-NC | ||
| coderefinery (2023) | GitHub without the command line | CC BY-NC 4.0 |
| Command | Description |
|---|---|
git tag |
Lists all tags |
git tag v1.0 |
Creates a tag on the basis of your current commit named v1.0 |
git tag v1.1 <commit-hash> |
Creates a tag on the basis of a specific commit hash named v1.1 |
git tag -a v1.0 -m "Release version 1.0" |
Creates an annotated tag on the basis of your current commit hash named v1.0 with the tagging message Release version 1.0 |
git push origin <tag-name> |
Pushes a specific tag to remote |
git push origin --tags |
Pushes all created tags to remote |
git fetch --tags |
Fetches all created tags from remote |
git pull --tags |
Pulls all created tags from remote |