
| Command | Description |
|---|---|
git init |
Initializes a folder as a Git repository |
git status |
Shows Git tracking status of files in the repository |
git add |
Adds file(s) to the staging area |
git commit |
Commits staged files |
git commit -m "commit message" |
Commits staged files with a commit message |
Session 5: Branches
Track, organize and share your work: An introduction to Git for research
Course at Zentralinstitut für Seelische Gesundheit
![]()
![]()
Wednesday, 22nd of January 2025, 15:00
1 Last session
Last session: First steps with Git & Git Essentials
After the last session, you should now be able to answer the following questions / do the following:
First steps with Git
💡 You can initialize a Git repository.
💡 You can check the status of a Git repository.
💡 You understand the difference between the staging area and a commit.
💡 You can stage and commit changes.
💡 You understand the difference between a commit message and a description.
Git essentials
💡 You know how to explore the commit history.
💡 You can compare different commits.
💡 You know how to use and create a .gitignore file.
💡 You can discuss which files can (not) be tracked well with Git and why.
💡 You know how to track empty folders in Git repositories.
Last session: Cheatsheet
First steps with Git
Last session: Cheatsheet
Git essentials
| Command | Description |
|---|---|
git log |
Views past commits |
git diff |
Views made changes compared to the last commit |
git mv |
Renames or moves files and automatically stages the changes |
Last session: recipes project
First steps with Git
At the end of this session, you should have accomplished the following:
- You set up Git.
- You initialized your
recipesfolder as a Git repository. - You committed your first file to the
recipesrepository.
Please keep the recipes folder! We will continue to use it in the following sessions.
Last session: recipes project
Git Essentials
At the end of this session, you should have accomplished the following:
- Commit at least three changes in
recipes.txt. - Make at least one commit using
git commit --amend.- For example, add a a new entry without a title first, commit, then add a title and use
git commit --amendto add the title change to the same commit.
- For example, add a a new entry without a title first, commit, then add a title and use
- Create a
.gitignorefile.- Everyone: Create a random file that you want to ignore, for example
image.jpg. - All macOS users: Let your repository ignore
.DS_Store.
- Everyone: Create a random file that you want to ignore, for example
- 🚀 Optional: Commit
.gitkeepin an otherwise empty directory.
Please keep the recipes folder! We will continue to use it in the following sessions.
Common questions after last session
“How can I make changes in a text (.txt) file?”
- Remember: It’s just a regular text file on your computer.
- Option 1: Use a regular text editor (e.g., TextEdit on macOS, Notepad++ on Windows, or others).
- Option 2: Use
vimdirectly from the command line (see chapter / session on “Setup”). - Option 3: Use command line commands like
echo "My text" >> recipes.txt.
“I ran git commit but nothing happened?”
- Maybe you forgot to run
git addbefore?
“Remember to cd into your recipes project folder!”
- Every time you open the command line, it starts at a default location (likely your home directory).
- Check in which folder you are, using
pwd(“print working directory”). - Use
cdto move to yourrecipesproject folder before you start running the Git commands.
Important note: Git repository in /user folder?
- Please make sure that your
recipesfolder is in a suitable place (for example, in theDesktop,Documentsfolders or where you keep your course-related files, …) and not in your user directory! - You can check your current working directory by running
pwdin yourrecipesfolder. - Also: Always remember to
cdinto your repository before you execute Git commands! - If your
recipesfolder is in your user directory, please tell us and we can fix it.
Tip: To prevent ever creating a Git repository inside your user folder, you can use:
Running git init in the user directory now results in a (desired) error:
Thanks to Eamon Caddigan for the idea!
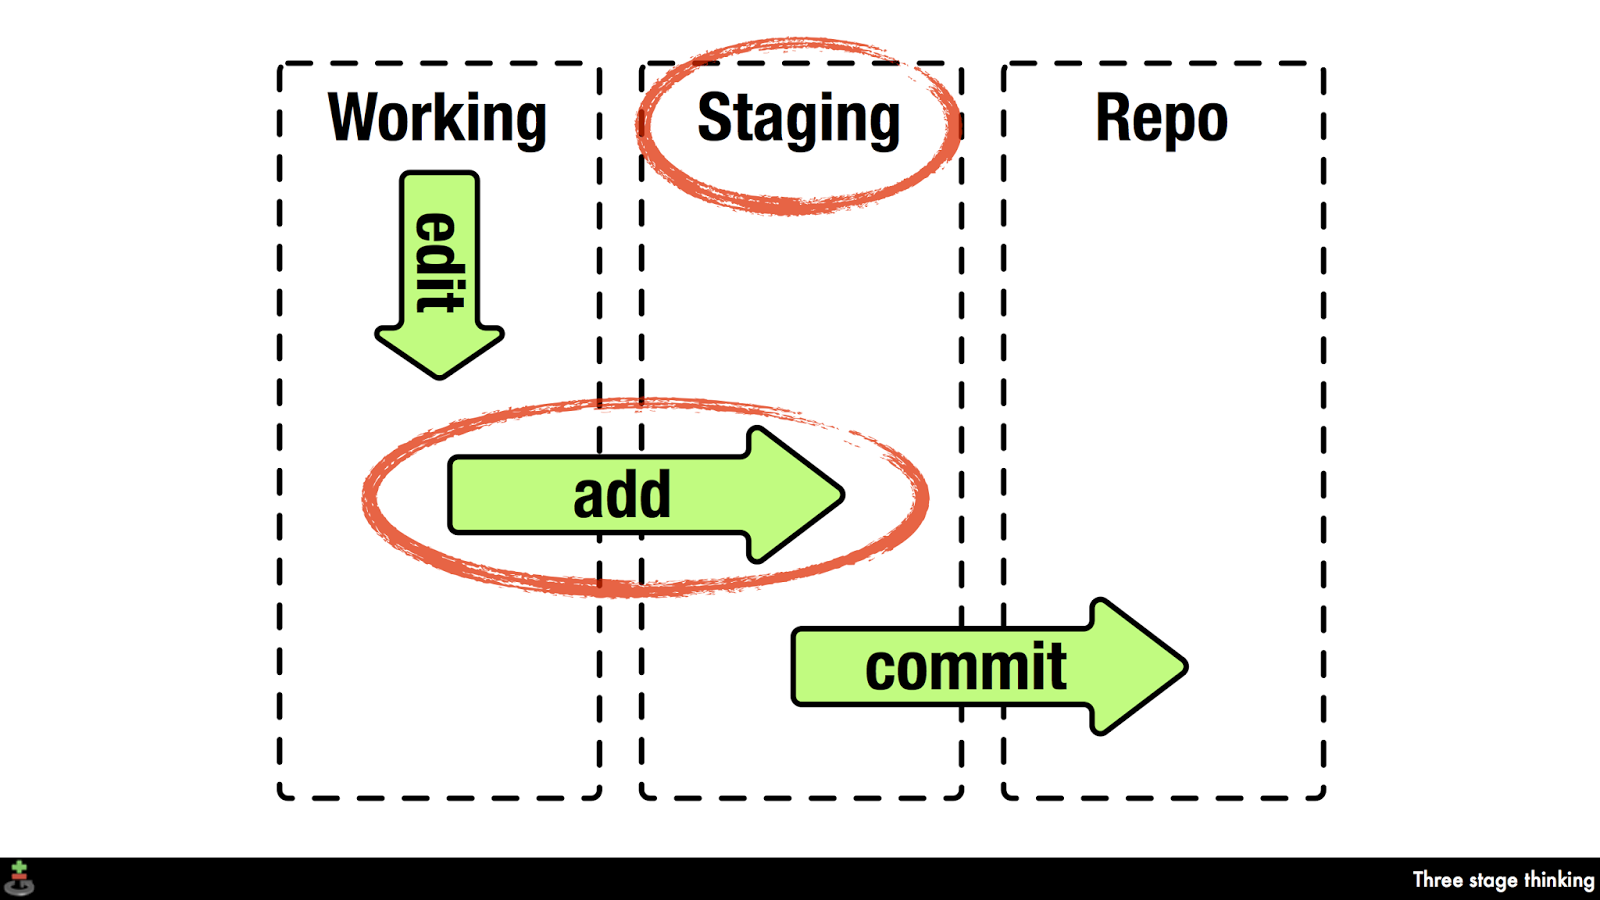
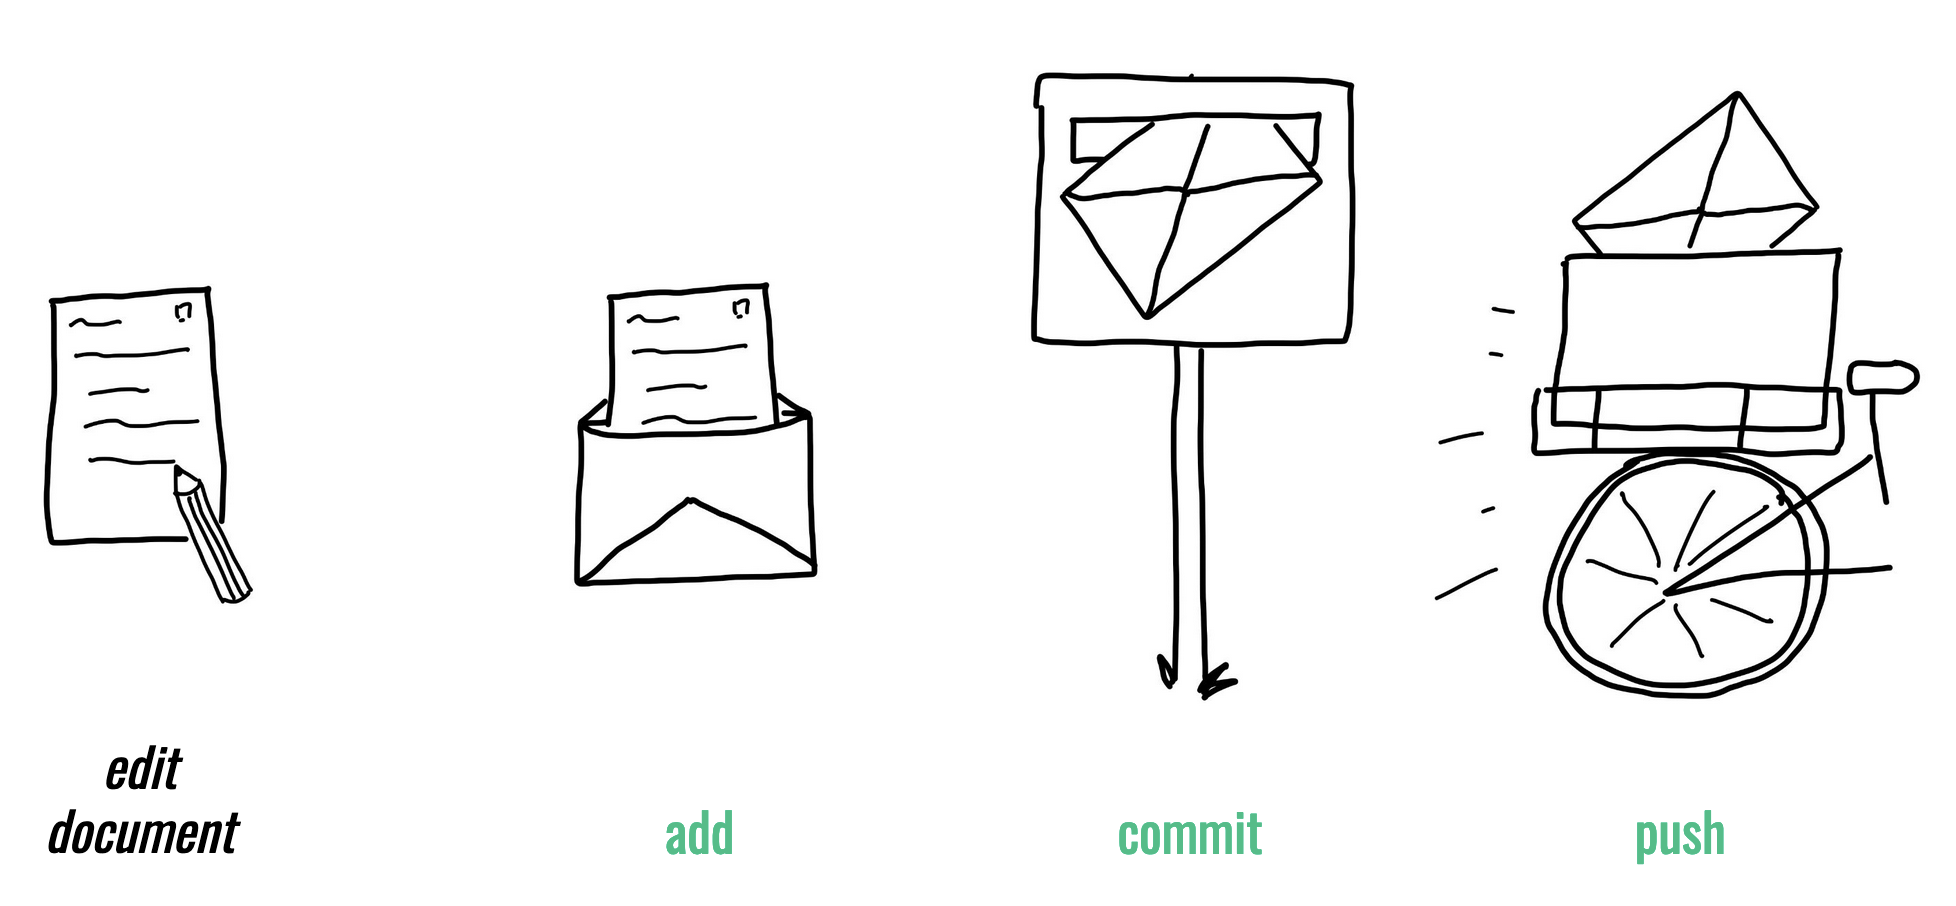
Staging and Committing
Staging:
- Command:
git add - Purpose: Preparing and organizing files before they are recorded in the repository’s history.
Committing:
- Command:
git commit -m "commit message" - Purpose: Saving the changes in the staged files to the repository’s history, creating a snapshot.
2 This session: Branches
This session: Branches

Figure 1: Image from Chapter “Git Branches” of the “The Turing Way handbook to reproducible, ethical and collaborative data science”, used under a Creative Commons Attribution 4.0 License.
Learning objectives
💡 You understand the purpose and benefits of using branches in Git.
💡 You can create and switch between branches.
💡 You can merge branches and resolve merge conflicts.
💡 You can name at least three best practices when working with branches.
Reading
Tasks
In this session, you will work on the following tasks:
- Reading: Read the chapter(s) “Branches” in the Version Control Book.
- Implementation: Try out the commands in the chapter.
- Exercises: Work on the exercises for the
recipesproject. - Quiz: Test your knowledge with the quiz.
As always:
- Try out the commands of this session and play around with them.
- Check whether you have achieved the learning objectives.
- Ask questions!
- Let’s git started!
recipes project
At the end of this session, you should have accomplished the following:
- You created a new branch and merged changes into your default branch (
mainormaster). - You created and resolved a merge conflict.
Please keep the recipes folder! We will continue to use it in the following sessions.
Cheatsheet
| Command | Description |
|---|---|
git branch |
Lists / creates and deletes branches |
git branch feature |
Creates the feature branch |
git branch -d feature |
Deletes the feature branch |
git switch |
Switches between branches |
git switch feature |
Switches to the feature branch |
git checkout |
Switches between branches |
git checkout -b feature |
Creates and switches to the feature branch |
git merge |
Merges branches |
git merge feature |
Merges the feature branch into the current branch |
git merge --abort |
Aborts a merge |
git merge --squash |
Squaches commits on branch into a single commit and merge |
git stash |
Stashes changes for later use |
git stash -m "stashing message" |
Stashes changes and includes a message |
git stash list |
Shows stored stashes |
git stash apply |
Applies the latest stash |
git stash apply stash@{n} |
Applies a specific stash |
git stash pop |
Applies the latest stash and removes it from stash list |
git stash pop stash@{n} |
Applies a specific stash and removes it from stash list |
git cherry-pick <commithash> |
Applies changes from <commithash> |
git rebase |
Different way of integrating changes from two branches |
Exercises
Branches
- If needed, navigate to the project repository using the command line.
- Create a new branch called
feature. - Switch to the new branch.
- Add a new entry to your project text file.
- Stage and commit the changes to the project text file on the
featurebranch. - View the contents of project text file to verify your changes.
- Switch back to the default branch (
mainormaster). - View the contents of the project text file again to confirm that the previous changes do not exist on the default branch.
- Merge the
featurebranch into your default branch. - Delete the
featurebranch. - View the contents of project text file yet again to confirm that the previous changes have been merged into the default branch.
🚀 Bonus exercises
Create and resolve a merge conflict
- Deliberately create a merge conflict by editing the same section of a file on two separate branches and attempting to merge them. An example can be found in the branches chapter.
- Resolve the merge conflict.
- Delete the merged branch afterwards.
Solutions: Branches
Code
#!/bin/bash

cd recipes # <1>
git branch feature # <2>
git switch feature # <3>
cat >> recipes.txt <<- EOM # <4>

Potatoes

1. Wash the potatoes and cut them into evenly sized chunks.
2. Bring water to the boil in a large saucepan.
3. Once the water is boiling, add a good pinch of salt.
3. Add the potatoes.
4. Cook the potatoes for 15 - 20 minutes or until fork-tender.
5. Drain the pasta in a colander.
EOM
git add recipes.txt # <5>
git commit -m "Add potatoes recipe to recipes.txt" # <5>
cat recipes.txt # <6>
git checkout main # <7>
cat recipes.txt # <8>
git merge feature # <9>
git branch -d feature # <10>
cat recipes.txt # <11>- Optional: Navigate into the project repository using
cd(or a similar path). - Create a new branch called
featureusinggit branch feature. - Switch to the new branch using
git switch feature. You can also create and switch the branch in one step usinggit checkout -b feature. - Add a new entry to your project text file file. You can use your regular text editor. Here, we add a new entry from the command line using
cat. - Stage and commit the changes to your project text file using
git addandgit commit. - View the contents of your project text file to verify your changes. Here, we use the
catcommand again. - Switch back to the default branch (
mainin this example). Here, we usegit checkout mainbut you can also usegit switch main. - View the contents of your project text file again to confirm that the previous changes do not exist on the
mainbranch. - Merge the changes
featurebranch into themainbranch. - Delete the merged
featurebranch usinggit branch -d feature. - View the contents of your project text file yet again to confirm that the previous changes have been merged into the
mainbranch.
Solutions: Merge Conflict
Code
#!/bin/bash

cd recipes # <1>
git branch feature # <2>
git switch feature # <3>
cat >> recipes.txt <<- EOM # <4>

Chocolate Cake

1. Preheat the oven to 350°F (175°C).
2. Mix flour, sugar, cocoa powder, baking powder, and salt in a bowl.
3. Add eggs, milk, oil, and vanilla extract, and mix well.
4. Pour the batter into a greased baking pan.
5. Bake for 30-35 minutes.

EOM
git add recipes.txt # <5>
git commit -m "Add chocolate cake recipe to recipes.txt" # <5>
git checkout main # <6>
cat >> recipes.txt <<- EOM # <7>

Vanilla Cake

1. Preheat the oven to 350°F (175°C).
2. Mix flour, sugar, baking powder, and salt in a bowl.
3. Add eggs, milk, oil, and vanilla extract, and mix well.
4. Pour the batter into a greased baking pan.
5. Bake for 25-30 minutes.

EOM

git add recipes.txt # <8>
git commit -m "Add vanilla cake recipe to recipes.txt" # <8>
git merge feature # <9>
sed -i '' -e '/^<<<<<<< /d' -e '/^=======/d' -e '/^>>>>>>> /d' recipes.txt # <10>
git add recipes.txt # <11>
git commit -m "Resolve merge conflict by adding both chocolate and vanilla cake recipes" # <12>
git branch -d feature # <13> - Navigate into the
recipesrepository usingcd(or a similar path). - Create a new branch called
featureusinggit branch feature. - Switch to the new branch using
git switch feature. You can also create and switch the branch in one step usinggit checkout -b feature. - Add a new recipe to your
recipes.txtfile usingcat. - Stage and commit the changes to
recipes.txtusinggit addandgit commit. - Switch back to the default branch (
mainin this example) usinggit checkout main. You can also usegit switch main. - Make conflicting changes in the
mainbranch torecipes.txtusingcat. - Stage and commit the conflicting changes to
recipes.txtusinggit addandgit commit. - Attempt to merge the
featurebranch with the default branch to create a merge conflict usinggit merge feature. - Resolve the merge conflict by editing
recipes.txt. You can use a regular text editor to do this. In this example, we remove the conflict markers that Git added torecipes.txtusingsedwhich results in keeping both recipes. This is not a recommended way to resolve merge conflicts and we only do it here to resolve the merge conflict without manual intervention. Merge conflicts usually always require manual resolution by the user. - Stage the resolved changes to
recipes.txtusinggit add. - Commit the resolved changes in
recipes.txtwith a descriptive commit message usinggit commit. - Delete the merged
featurebranch usinggit branch -d feature.
Version Control Course