Publication: How to publish your DataLad datasets
Tutorial: Research Data Management with DataLad

Unlike the Tutorial, this chapter does not provide a notebook. Publishing a DataLad dataset requires credentials (such as SSH keys or app passwords) and access to remote services that are specific to your local setup. These steps must be run locally and cannot be executed in a cloud environment like Google Colab.
Nextcloud
Introduction
Nextcloud is a self-hosted, open-source cloud storage and collaboration platform. It provides a WebDAV interface, which DataLad can use to publish datasets — including their annexed file contents — without requiring any additional external hosting service. This makes Nextcloud a convenient option for institutions that already operate their own Nextcloud instance, such as many universities.
Publishing a DataLad dataset to Nextcloud uses the datalad-next extension, which adds the datalad create-sibling-webdav command. Unlike GIN, Nextcloud does not natively understand git or git-annex, so DataLad uses a special export-tree layout to store both the dataset metadata and its file contents on the WebDAV share.
Prerequisites
In order to use Nextcloud for hosting and sharing your datasets, you need to:
- Have an existing DataLad dataset (see the Tutorial for instructions on creating one).
- Have access to a Nextcloud instance (either self-hosted or provided by your institution).
- Have
datalad-nextinstalled, which provides thedatalad create-sibling-webdavcommand. - Create an App Password on Nextcloud to authenticate DataLad (see below — using your regular Nextcloud password is not recommended).
Create an App Password
App passwords allow external applications to access your Nextcloud account without using your main password. This is more secure and lets you revoke access at any time without changing your account password.
- Log in to your Nextcloud instance in a web browser.
- Click your profile icon in the top right and select Settings.
- Click Security on the left menu.
- Scroll down to the Devices & sessions section.
- In the “App name” field, enter a name to identify the device (e.g., “My Work Laptop”).
- Click Create new app password.
- Copy the generated password immediately and save it in a password manager — it will not be shown again.
Publishing your dataset to Nextcloud
Here we describe how to publish your dataset to a Nextcloud instance using datalad create-sibling-webdav. Replace the URL below with the WebDAV URL of your own Nextcloud instance and adjust the path to the desired folder name for your dataset.
DataLad will prompt you for your Nextcloud username and the app password you created above:
On success, DataLad creates two siblings: a storage sibling that holds the annexed file contents, and a git sibling that holds the dataset history. The output will look similar to this:
create_sibling_webdav.storage(ok): . [nextcloud-storage: https://cloud.uni-hamburg.de/remote.php/dav/files/USERNAME/mydataset]
[INFO   ] Configure additional publication dependency on "nextcloud-storage"
create_sibling_webdav(ok): . [nextcloud: datalad-annex::?type=webdav&encryption=none&exporttree=yes&url=https%3A//cloud.uni-hamburg.de/remote.php/dav/files/USERNAME/mydataset]
Afterwards, you can push your dataset — including all annexed file contents — with datalad push:
copy(ok): .datalad/.gitattributes (dataset)
copy(ok): .datalad/config (dataset)
copy(ok): .gitattributes (dataset)
copy(ok): test.txt (dataset)
publish(ok): . (dataset) [refs/heads/master->nextcloud:refs/heads/master [new branch]]
publish(ok): . (dataset) [refs/heads/git-annex->nextcloud:refs/heads/git-annex [new branch]]

action summary:
  copy (ok: 4)
  publish (ok: 2)
Your dataset files are now accessible through the Nextcloud web interface and can be shared with collaborators using the standard Nextcloud sharing features.
Resources
“Deposit and retrieve DataLad datasets with WebDAV services” on YouTube
GIN
These instructions were taken from Walk-through: Dataset hosting on GIN in the DataLad Handbook.
Introduction
GIN (G-Node infrastructure) is a free data management system designed for comprehensive and reproducible management of scientific data. It is a web-based repository store and provides fine-grained access control to share data. GIN builds up on Git and git-annex, and is an easy alternative to other third-party services to host and share your DataLad datasets. GIN looks and feels similar to GitHub, and among a number advantages, it can assign a DOI to your dataset, making it citeable. Moreover, its web interface and client are useful tools with a variety of features that are worthwhile to check out, as well. It allows to share datasets and their contents with selected collaborators or making them publicly and anonymously available.

Prerequisites
In order to use GIN for hosting and sharing your datasets, you need to
- Have an existing DataLad dataset (see the Tutorial for instructions on creating one).
- Register on GIN.
- Upload your public SSH key for SSH access (for instructions, see Setup).
Once you have registered an account on the GIN server by providing your e-mail address, affiliation, and name, and selecting a user name and password, you should upload your SSH key to allow SSH access. To do this, visit the settings of your user account. On the left hand side, select the tab “SSH Keys”, and click the button “Add Key”:
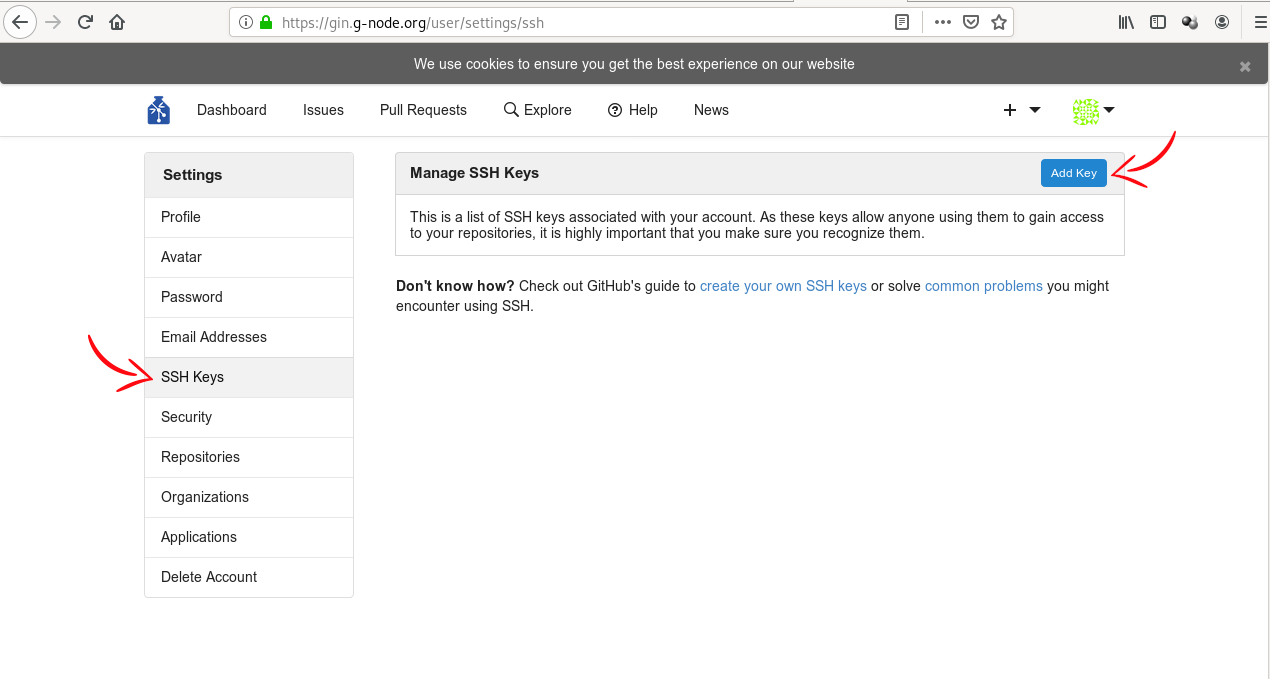
You should copy the contents of your public key file into the field labeled content, and enter an arbitrary but informative Key Name, such as “My private work station”. Afterwards, you are done!
Publishing your dataset to GIN
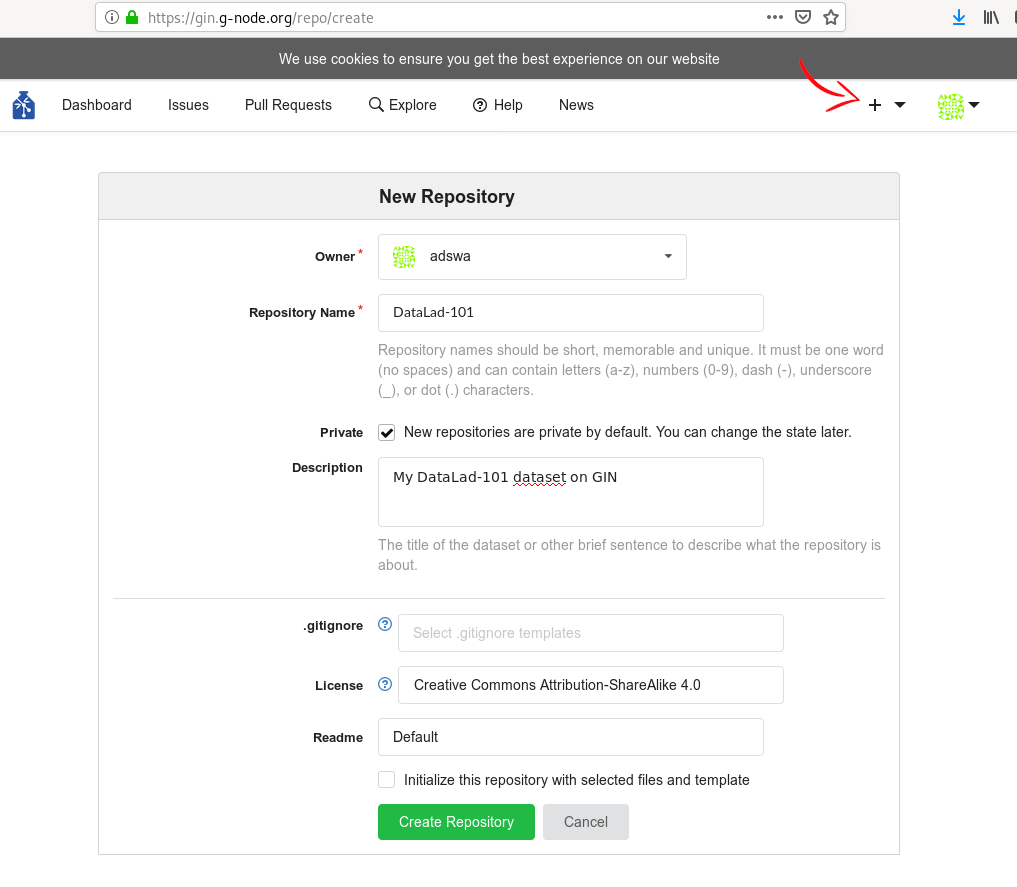
Here, we describe how to publish your dataset to GIN by creating a new, empty repository on GIN via the web interface. For the alternative way via the [datalad create-sibling-gin] command, please see the DataLad Handbook.
If you choose to create a new repository via GIN’s web interface, make sure to not initialize it with a README:
Afterwards, add this repository as a sibling of your dataset. To do this, use the datalad siblings add command and the SSH URL of the repository.
Note that since this is the first time you will be connecting to the GIN server via SSH, you will likely be asked to confirm to connect. This is a safety measure, and you can type “yes” to continue
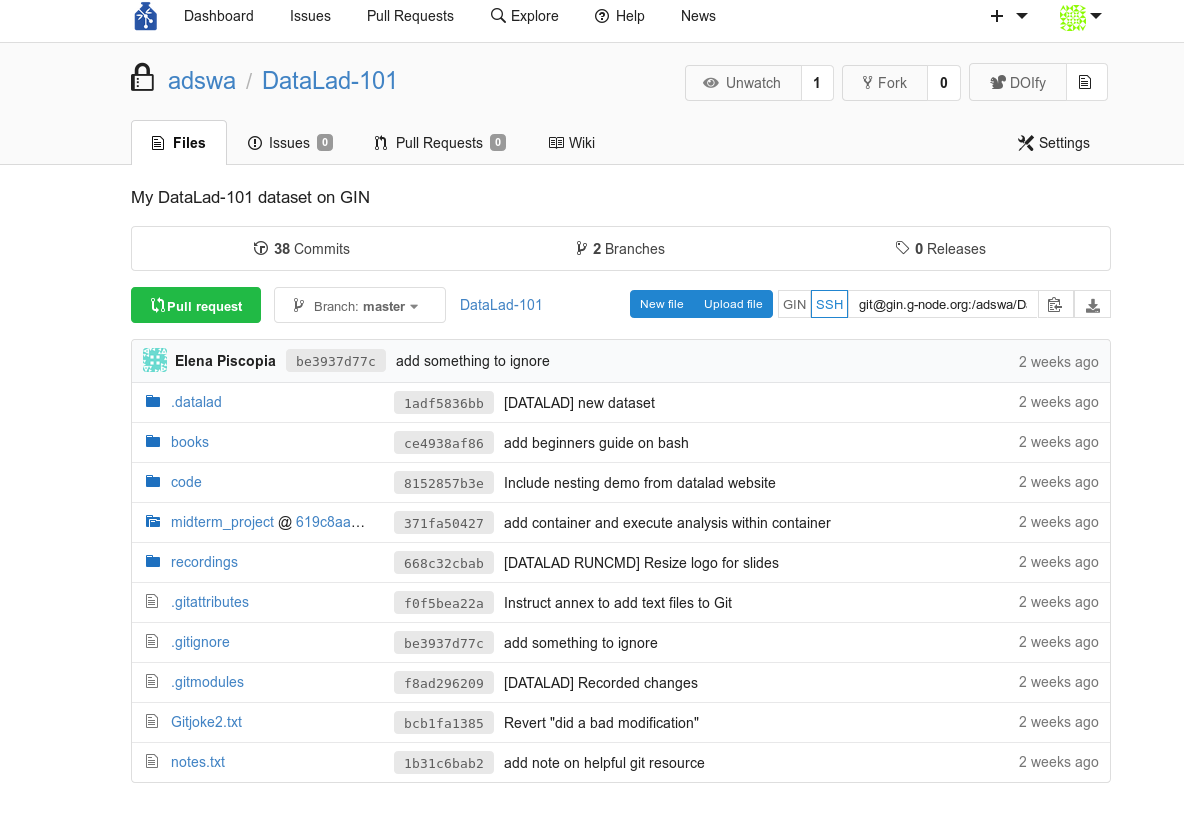
Afterwards, you can publish your dataset with datalad push. As the repository on GIN supports a dataset annex, there is no publication dependency to an external data hosting service necessary, and the dataset contents stored in Git and in git-annex are published to the same place:
copy(ok): books/TLCL.pdf (file) [to gin...]
copy(ok): books/bash_guide.pdf (file) [to gin...]
copy(ok): books/byte-of-python.pdf (file) [to gin...]
copy(ok): books/progit.pdf (file) [to gin...]
publish(ok): . (dataset) [refs/heads/git-annex->gin:refs/heads/git-annex ✂FROM✂..✂TO✂]
publish(ok): . (dataset) [refs/heads/main->gin:refs/heads/main [new branch]]
On the GIN web interface you will find all of your dataset – including annexed contents! What is especially cool is that the GIN web interface (unlike GitHub) can even preview your annexed contents.