Setup: How to setup and run the tutorial
Tutorial: Research Data Management with DataLad

Download notebooks
Download notebooks from the right sidebar. Select Colab if you are using Google Colab.
To download a notebook, right-click the download button and select “Save link as …” (or “Save as …”). Do not left-click the link, as this may open the file in the browser instead of downloading it.
Computational environments
There are several options for running the tutorial notebook. Choose the environment that best fits your setup:
- Google Colab: Run the notebook in the cloud using a free Google account (no local installation required).
- Docker Container: Run the notebook in a pre-configured, isolated container on your local machine.
- Terminal: Copy-paste commands directly into a local Terminal without using a notebook. This also works in Google Colab
- JupyterHub at UHH. Run the notebook on the JupyterHub server of the University of Hamburg. This requires an account at University of Hamburg.
Google Colab
- Open https://colab.research.google.com/
- Sign in with a Google account
- Select
File>Open notebook - Select
Uploadand open or drag the notebook file - Paste the installation command into the first cell of the notebook:
Docker Container
The tutorial can also be run inside a Docker container that has DataLad and all its dependencies pre-installed. This requires Docker to be installed on your system.
Clone the repository and navigate into it:
Build the DataLad Docker image:
Or directly with Docker:
Start an interactive shell inside the container:
Or directly with Docker:
This drops you into a Bash shell with DataLad, git-annex, and all dependencies ready to use.
Verify the installation inside the container:
You can now copy-paste all commands from the tutorial directly into this shell.
Terminal
- Open a Terminal and copy-paste all commands in the tutorial
JupyterHub at UHH
Select
File>New LauncherAt the bottom, select
TerminalIn the Terminal, enter:
From the sidebar on the left, you can now open the tutorial notebook in the
rdm-dataladfolder:tutorial.ipynb
Paste the installation command into the first cell of the notebook:
Connecting to a remote repository hosting service
Authentication
To connect your DataLad dataset to a remote repository, you need to establish an authentication method. Authentication verifies your identity before granting access to a remote repository — similar to showing your ID before entering a restricted area. It ensures that only authorized people or programs can read from or write to the repository. Different platforms support different authentication methods. Here, we introduce the Secure Shell Protocol (SSH).
Secure Shell Protocol (SSH)
The Secure Shell Protocol (SSH) is a cryptographic network protocol for operating network services securely over an unsecured network. Its most notable applications are remote login and command-line execution. You can read and write data in remote repositories like GitHub and GitLab using SSH. For more details on SSH, see Wikipedia.
When you set up SSH, you generate a key pair: the private key stays on your device, while the public key is copied to the servers you want access to.
Think of your public key as a padlock. You can make lots of copies of this padlock and distribute them to different places - servers, computers, or anything you want to secure (just like sharing a padlock to secure different lockers). These places install your padlock, but no one can open it because they don’t have your key.
Your private key is the actual key that opens those padlocks. You keep it safe and never share it. As long as your key stays secure, it doesn’t matter how many padlocks you’ve distributed.
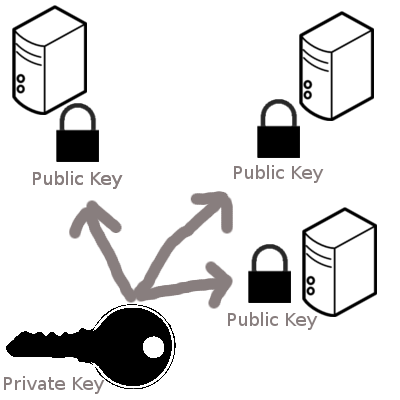
When you try to connect to a server, SSH checks if the padlock (public key) on that server matches your key. If they match, the door opens.
This system ensures that only someone with the private key (you) can unlock what’s protected by the padlocks (public keys). For extra security, you can protect your private key with an additional password. Even if someone steals your key, they still need the combination (password) to use it. For additional discussion of using an additional password for a private SSH key, see Tip 1.
We provide basic instructions that are applicable to many remote repositories below. For more detailed instructions, see the GitHub Documentation. The most basic SSH key setup works like this:
- Generating a new SSH key.
- Copying the SSH key to your clipboard.
- Adding the SSH key to your GitHub or GitLab account.
Generating a new SSH key
- Open the Command Line.
- Run the command below, replacing the example email address with your own.
- 1
-
Replace
your_email@example.comwith your email address.
This will result in an output similar to this:
- When asked to “Enter a file in which to save the key”, press EnterEnter to accept the default location.
If the SSH key already exists, you will get an output similar to this:
If you don’t want to overwrite the existing key, type n and hit EnterEnter. You can now use the existing key and move on with the next step (adding the SSH key to your remote repository hosting service).
- When prompted, enter a secure passphrase. If you do not want to use a passphrase, press EnterEnter twice to skip.
If someone gains access to your computer, they can use your SSH keys to access all systems that rely on those keys. For extra security, you can protect your private key with a passphrase. Even if someone steals your private key, they still need the passphrase to use it. Adding a passphrase to your private SSH key therefore makes it significantly more secure.
To avoid typing the passphrase each time you connect, you can securely store it in an SSH agent. For more details, see the GitHub documentation.
-t flag in the ssh-keygen command do?
The -t flag in the ssh-keygen command specifies the type of key to generate. Common options include rsa, ecdsa, and ed25519. For example, -t ed25519 generates a modern and secure Ed25519 key, which is recommended for most users. This flag ensures you’re using the desired encryption algorithm when creating your SSH key.
After entering (or skipping) a passphrase, your terminal output should look similar to this:
Your identification has been saved in /Users/user/.ssh/id_ed25519
Your public key has been saved in /Users/user/.ssh/id_ed25519.pub
The key fingerprint is:
SHA256: A2C4D8E9F9B3B2A4157C8D9E1FBB4D567543F2C9C4E6A3D422D8F7A1B3E5C6D0 user@email.com
The key's randomart image is:
+--[ED25519 256]--+
|               . |
|              +  |
|             Eo. |
|    .         =+.|
|   . .. S    = =o|
|. . ...+ .  . B +|
|.+ = .+ *  . +.*o|
|..=..+.= ..   Bo=|
| .o.o..   ..  .++|
+----[SHA256]-----+
Copying the public SSH key to your clipboard
Now copy the SSH public key to your clipboard. The following command will paste the contents of the id_ed25519.pub file to your Terminal (assuming your SSH key is in the default location). From there you can copy the SSH public key.
Alternatively, find the hidden .ssh folder in your home directory, open the id_ed25519.pub file in your favorite text editor, and copy the contents to your clipboard.
Adding the SSH key to your account
Finally, add the public SSH key to your account on the remote repository hosting service.
- In the upper-right corner of any page on GitHub, click your profile photo, then click Settings.
- In the “Access” section of the sidebar, click SSH and GPG keys.
- Click New SSH key or Add SSH key.
- In the “Title” field, add a descriptive label for the new key. For example, if you’re using a personal laptop, you might call it “Personal laptop”.
- Choose the type of key, either authentication or signing. Usually, you want to select “authentication” here.
- In the “Key” field, paste your public key.
- Click Add SSH key.
- If prompted, confirm access to your GitHub account.