Code
1ssh-keygen -t ed25519 -C "your_email@example.com"- 1
-
Replace
your_email@example.comwith your email address.
This chapter will introduce you to remote repositories. These are versions of your Git repository that are hosted on a server, in particular using popular platforms like GitHub and GitLab. You will learn that remote repositories are useful for collaboration and backup. You will also learn how to create an account and authenticate to the service.
Research often involves collaboration among multiple researchers, labs, or institutions. Using remote repositories on platforms like GitHub or GitLab allows all team members to access and contribute to a central codebase or dataset. The setup of remote repositories enables efficient tracking of contributions, facilitates peer reviews, and ensures reproducibility across research teams.
Research data can be sensitive, and ensuring its safety is crucial. By using remote repositories, researchers can create secure backups of their datasets and analysis code. Git hosting platforms offer authentication protocols like SSH and Personal Access Tokens (PATs), which enhance data security during transmission. This is particularly important in the context of ensuring the ethical handling of research data and protecting datasets from accidental deletion or corruption on local machines. Please note that data privacy can only be verified on remote repositories hosted by your institution.
A remote repository is a version of your Git repository that is hosted on a server, usually on the internet. Unlike your local Git repository, which is on your personal computer, a remote repository can be a shared resource that allows multiple contributors to collaborate on a project. These remote repositories could be hosted on platforms like GitHub, GitLab, Bitbucket Codeberg, or a private server. In this chapter, we will mainly focus on the repository hosting platforms GitHub, mainly because it is the most popular platform for Git repositories with 100 million users (as of January 2023, according to Wikipedia) and GitLab, since it is a very popular alternative to GitHub and offered by many academic institutions.
One of the main reasons to use remote repositories is for collaboration. If your Git repository only exists on your computer, no one else can access it. Remote repositories provide a central location where team members can collectively work on a project. Whether contributors are across the room or across the globe, remote repositories make it possible for everyone to access the same set of project files and contribute to the development process.
Hosting a project on a remote repository also serves as a backup mechanism. If a contributor’s computer fails or their files get corrupted, they can always download a fresh copy of the project from the remote repository. This ensures that the project’s progress is not dependent on a single person’s computer. Figure 9.1 jokingly illustrates this point.

Please find instructions below on how to create an account and log in to various remote repository hosting services. Not sure which username to choose? Check out Tip 9.2 for some ideas.
The GitHub Student Developer Pack is a program offered by GitHub to students, providing them with free access to a collection of useful developer tools and services. To benefit from the pack, visit the GitHub Education website and sign up with your student email to verify your academic status. Once verified, you gain access to various resources, including GitHub Pro with unlimited private repositories, free domain names, cloud credits, coding courses, and more.
After creating an account you will be asked why you want to sign up and what your role is. You will also have to either create a new project or join a project.
Are you a member of the University of Hamburg? Here’s how you can log in to the university’s GitLab instance:
Are you a member of the Max Planck Institute for Human Development? Here’s how you can log in to the institute’s GitLab instance:
Both GitHub and GitLab will ask you to choose a username. On GitLab instances hosted by your institution or company, your username might be automatically set when you log in with your regular credentials.
Here are some tips for choosing a username:
-) for word separation.user.email configuration and my GitHub email address?
In the “Setup” chapter you learned how to configure your user.email in Git. The user.email in Git is the email address used to identify your commits in version control history. The email address on GitHub is associated with your account for notifications, settings, and profile information. They don’t have to be the same. For example, you might use a personal email for your GitHub account but set a different email in Git for your commits, such as a work or a private email. However, if you want your GitHub profile to show your commits correctly, the email in your Git config should match an email associated with your GitHub account.
In order to connect your local Git repository to a remote repository, you need to establish an authentication method. Authentication is needed to access and work with repositories that are stored on remote repositories. It’s like showing your ID to prove who you are before entering a restricted area. It’s necessary to make sure only the right people or programs can access and do things on the remote repository, keeping everything safe and organized. Depending on the platform there are different authentication methods available. We introduce the most common authentication methods below, separately for each platform.
The Secure Shell Protocol (SSH) is a cryptographic network protocol for operating network services securely over an unsecured network. Its most notable applications are remote login and command-line execution. You can read and write data in remote repositories like GitHub and GitLab using SSH. For more details on SSH, see Wikipedia.
When you set up SSH, you generate a key pair: the private key stays on your device, while the public key is copied to the servers you want access to.
Think of your public key as a padlock. You can make lots of copies of this padlock and distribute them to different places - servers, computers, or anything you want to secure (just like sharing a padlock to secure different lockers). These places install your padlock, but no one can open it because they don’t have your key.
Your private key is the actual key that opens those padlocks. You keep it safe and never share it. As long as your key stays secure, it doesn’t matter how many padlocks you’ve distributed.
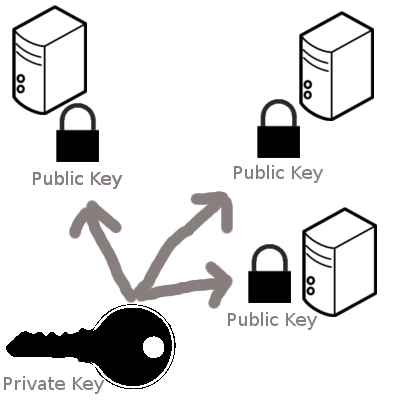
When you try to connect to a server, SSH checks if the padlock (public key) on that server matches your key. If they match, the door opens.
This system ensures that only someone with the private key (you) can unlock what’s protected by the padlocks (public keys). For extra security, you can protect your private key with an additional password. Even if someone steals your key, they still need the combination (password) to use it. For additional discussion of using an additional password for a private SSH key, see Tip 9.5.
We provide basic instructions that are applicable to both GitHub and GitLab below. For more detailed instructions, see the GitHub Documentation. The most basic SSH key setup works like this:
Code
1ssh-keygen -t ed25519 -C "your_email@example.com"your_email@example.com with your email address.
This will result into an output similar to this:
Output
Generating public/private ed25519 key pair.
Enter file in which to save the key (/Users/user/.ssh/id_ed25519): If the SSH key already exists, you will get an output similar to this:
Output
/Users/user/.ssh/id_ed25519 already exists.
Overwrite (y/n)? n
If you don’t want to overwrite the existing key, type n and hit EnterEnter. You can now use the existing key and move on with the next step (adding the SSH key to your remote repository hosting service).
Code
Enter passphrase (empty for no passphrase): [Type a passphrase]
Enter same passphrase again: [Type passphrase again]If someone gets into your computer, they can use your SSH keys to access all systems that use those keys. For extra security, you can protect your private key with an additional password. Even if someone gets access to your computer and steals your private key, they still need the combination (password) to use it. Adding a password to your private SSH key therefore makes it more secure.
To avoid typing the passphrase each time you connect, you can securely store it in an SSH agent. For more details, see the GitHub documentation.
-t flag in the ssh-keygen command do?
The -t flag in the ssh-keygen command specifies the type of key to generate. Common options include rsa, ecdsa, and ed25519. For example, -t ed25519 generates a modern and secure Ed25519 key, which is recommended for most users. This flag ensures you’re using the desired encryption algorithm when creating your SSH key.
After (not) having entered a passphrase, your command line output should look similar to this:
Output
Your identification has been saved in /Users/user/.ssh/id_ed25519
Your public key has been saved in /Users/user.ssh/id_ed25519.pub
The key fingerprint is:
SHA256: A2C4D8E9F9B3B2A4157C8D9E1FBB4D567543F2C9C4E6A3D422D8F7A1B3E5C6D0 user@email.com
The key's randomart image is:
+--[ED25519 256]--+
|               . |
|              +  |
|             Eo. |
|    .         =+.|
|   . .. S    = =o|
|. . ...+ .  . B +|
|.+ = .+ *  . +.*o|
|..=..+.= ..   Bo=|
| .o.o..   ..  .++|
+----[SHA256]-----+Now copy the SSH public key to your clipboard. The following command will copy the contents of the id_ed25519.pub file to your clipboard (assuming your SSH key is in the default location). Select the right command for your operating system and enter it into the Command Line.
Code
pbcopy < ~/.ssh/id_ed25519.pubIf the pbcopy command isn’t working, find the hidden .ssh folder in your home directory, open the id_ed25519.pub file in your favorite text editor, and copy the contents to your clipboard.
Code
clip < ~/.ssh/id_ed25519.pubIf the clip command isn’t working, find the hidden .ssh folder in your home directory, open the id_ed25519.pub file in your favorite text editor, and copy the contents to your clipboard.
Code
cat ~/.ssh/id_ed25519.pubThen select and copy the contents of the id_ed25519.pub file displayed in the terminal to your clipboard.
Alternatively, find the hidden .ssh folder in your home directory, open the id_ed25519.pub file in your favorite text editor, and copy the contents to your clipboard.
Finally, paste the public SSH key your account on the remote repository hosting service.
As a first step, try going through the process again, whilst paying special attention to doing every step carefully. Oftentimes, there is some confusion when copying the SSH key to the clipboard or when entering a new passphrase, as there’s no visible feedback. After entering the command for copying the SSH key, you can usually trust that it is in your clipboard and move on to the next step. Similarly, be cautious what you are typing in as a passphrase, as you can’t see what you are entering. If you don’t want a passphrase, simply click enter twice when asked to set one up, leaving the passphrase empty.
Another issue could be that you have a pre-existing SSH key set up. You will get a warning about this and can simply use this pre-existing one to connect to your remote server of choice.
If none of these were the source of your issues, check out the GitHub SSH key troubleshooting documentation or the GitLab troubleshooting SSH site.
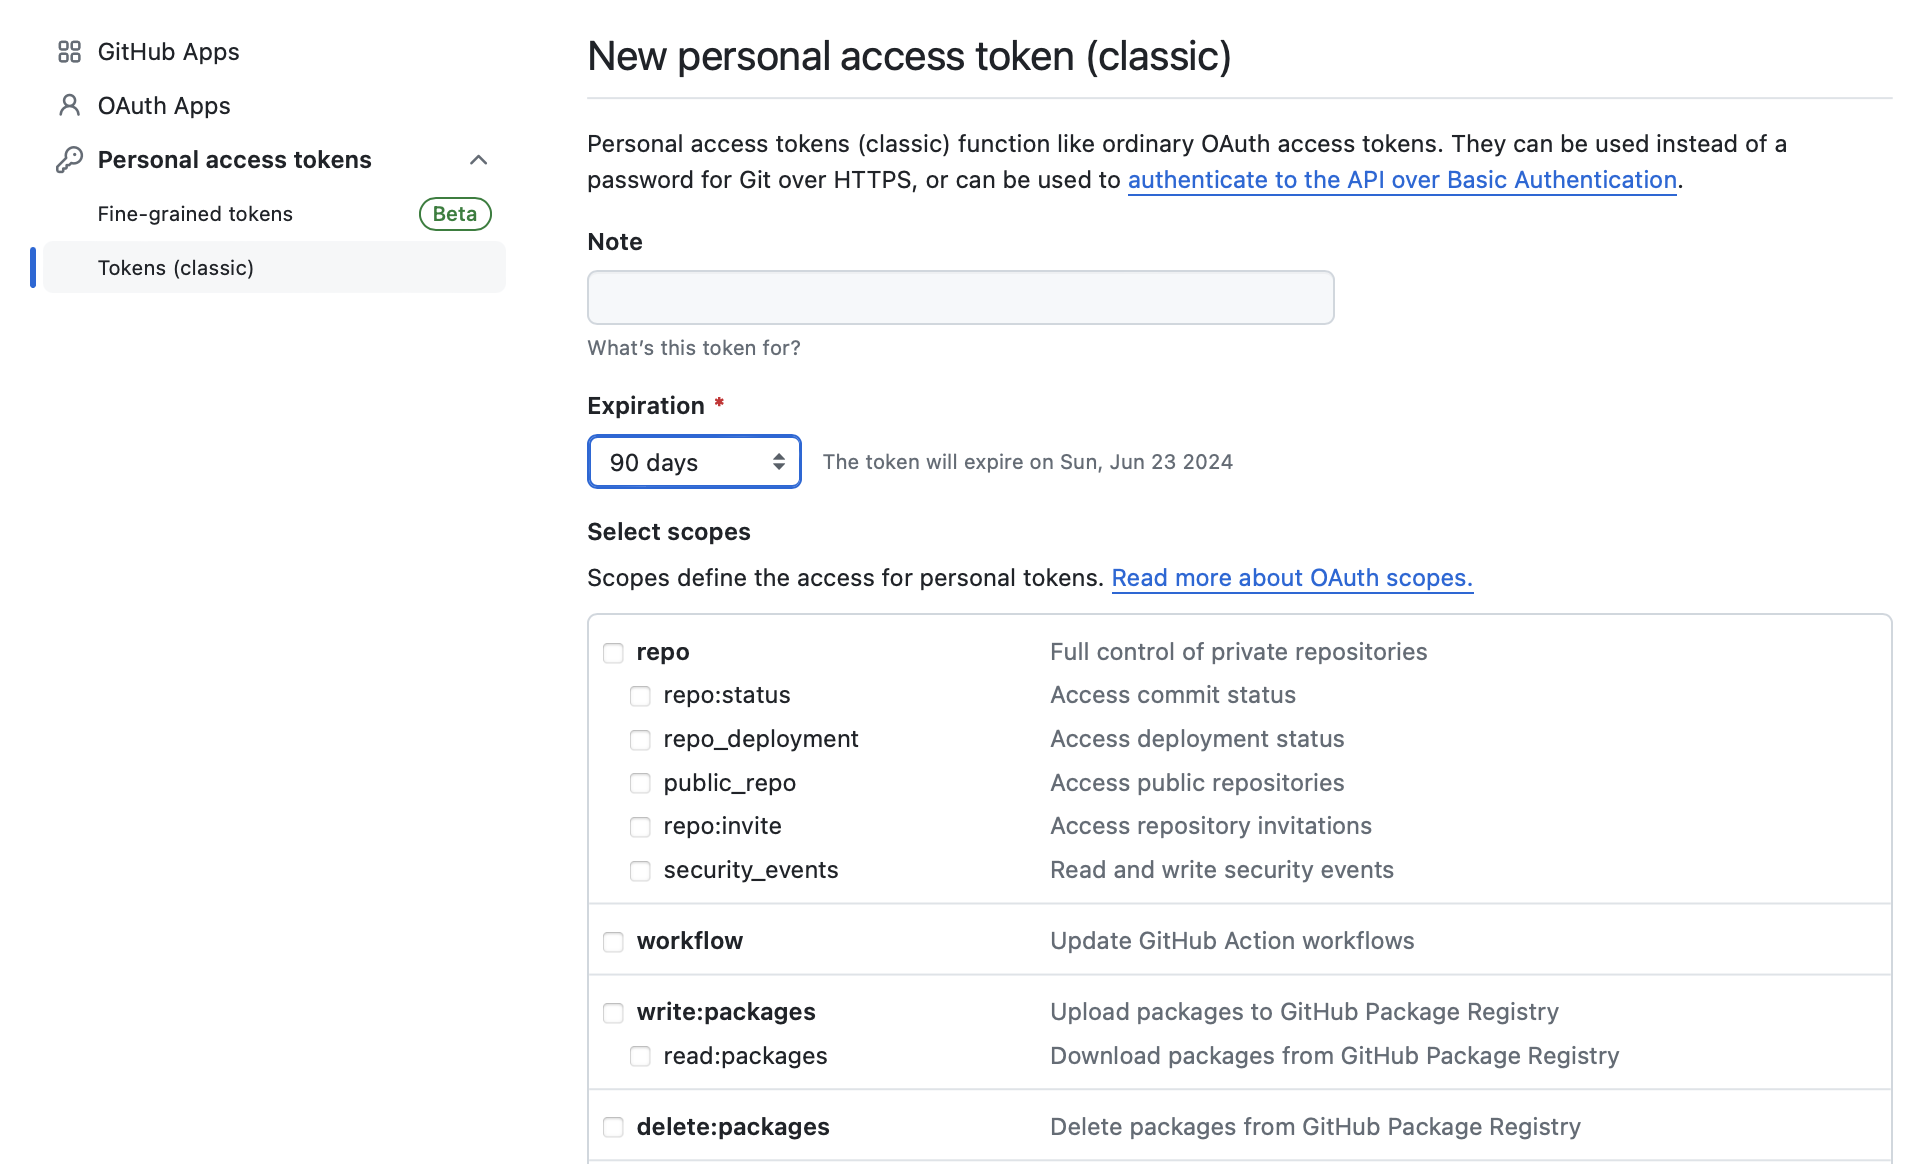
Follow these steps to set a Personal Access Token (PAT; see Figure 9.3):
Log in to your GitHub account on GitHub.com
Click on your profile picture in the top-right corner and select “Settings”.
In the left sidebar, select “Developer settings”, then “Personal access tokens (classic)”.
Click “Generate new token”.
Give your token a name. The name should help you to later identify in which context you used the token. For example, you could add a short description of the machine that you generated the token for, for example MacBook Pro 14-inch, 2021.
Choose the desired scopes. The scopes define the permissions of the token, or “what it is allowed to do” with your GitHub account and repositories. For a normal use case, you should enable the scopes repo, admin:org and delete_repo for a full access.
Set an expiration date if needed. You can also choose “No expiration”.
Click “Generate token,” and you’ll be presented with your new token.
Make sure to copy the Personal Access Token (PAT) as it won’t be shown again! The first time you try to interact with a remote repository, you will get asked for a password. Paste the PAT as the password into the terminal to proceed.
If you use Git Bash on Windows, your terminal will open a window where you can choose to authenticate yourself with a PAT.
When authenticating with GitHub on macOS, you may notice that the password doesn’t show up in the command line as you type it. This is normal behavior to ensure security. You can still enter your password (or delete what you typed) even though it doesn’t appear on the screen. You can also copy and paste text, for example your PAT from GitHub. When authenticating on Windows, a new window might pop up in which you can enter your PAT.
Expiration Date:
When you create a Personal Access Token, you can specify its expiration date. The expiration date is the date and time when the token becomes invalid and cannot be used for authentication anymore. Setting an expiration date is a security measure to limit the time during which the token can be misused if it falls into the wrong hands. Creating an expiration date for a GitHub Personal Access Token (PAT) is not strictly necessary, but it is considered a good security practice.
Scopes:
When you create a PAT, you can choose the scopes to define what actions the token is allowed to perform. These scopes determine the level of access the token has to different parts of your GitHub account or repositories.
Here are some common scopes you might encounter when creating a GitHub PAT:
repo: This scope provides full control of private and public repositories, including the ability to read, write, and delete code.
repo:status: Grants access to commit statuses, allowing the token to read and set commit status for a repository.
repo_deployment: Enables the token to access deployment-related events and perform actions related to repository deployments.
read:org: Allows the token to read organization membership, teams, and repositories within an organization.
user: Grants access to user-related data, including user profile information.
delete_repo: Provides permission to delete repositories.
admin:org: Offers administrative access to the entire organization, including managing teams and repositories.
To synchronize the Git repository on your computer with a remote repository on a repository hosting service like GitHub or GitLab, you first need to create a remote repository on the platform, usually through the browser. In this section, you will find detailed instructions on how to create a remote repository on GitHub or GitLab.
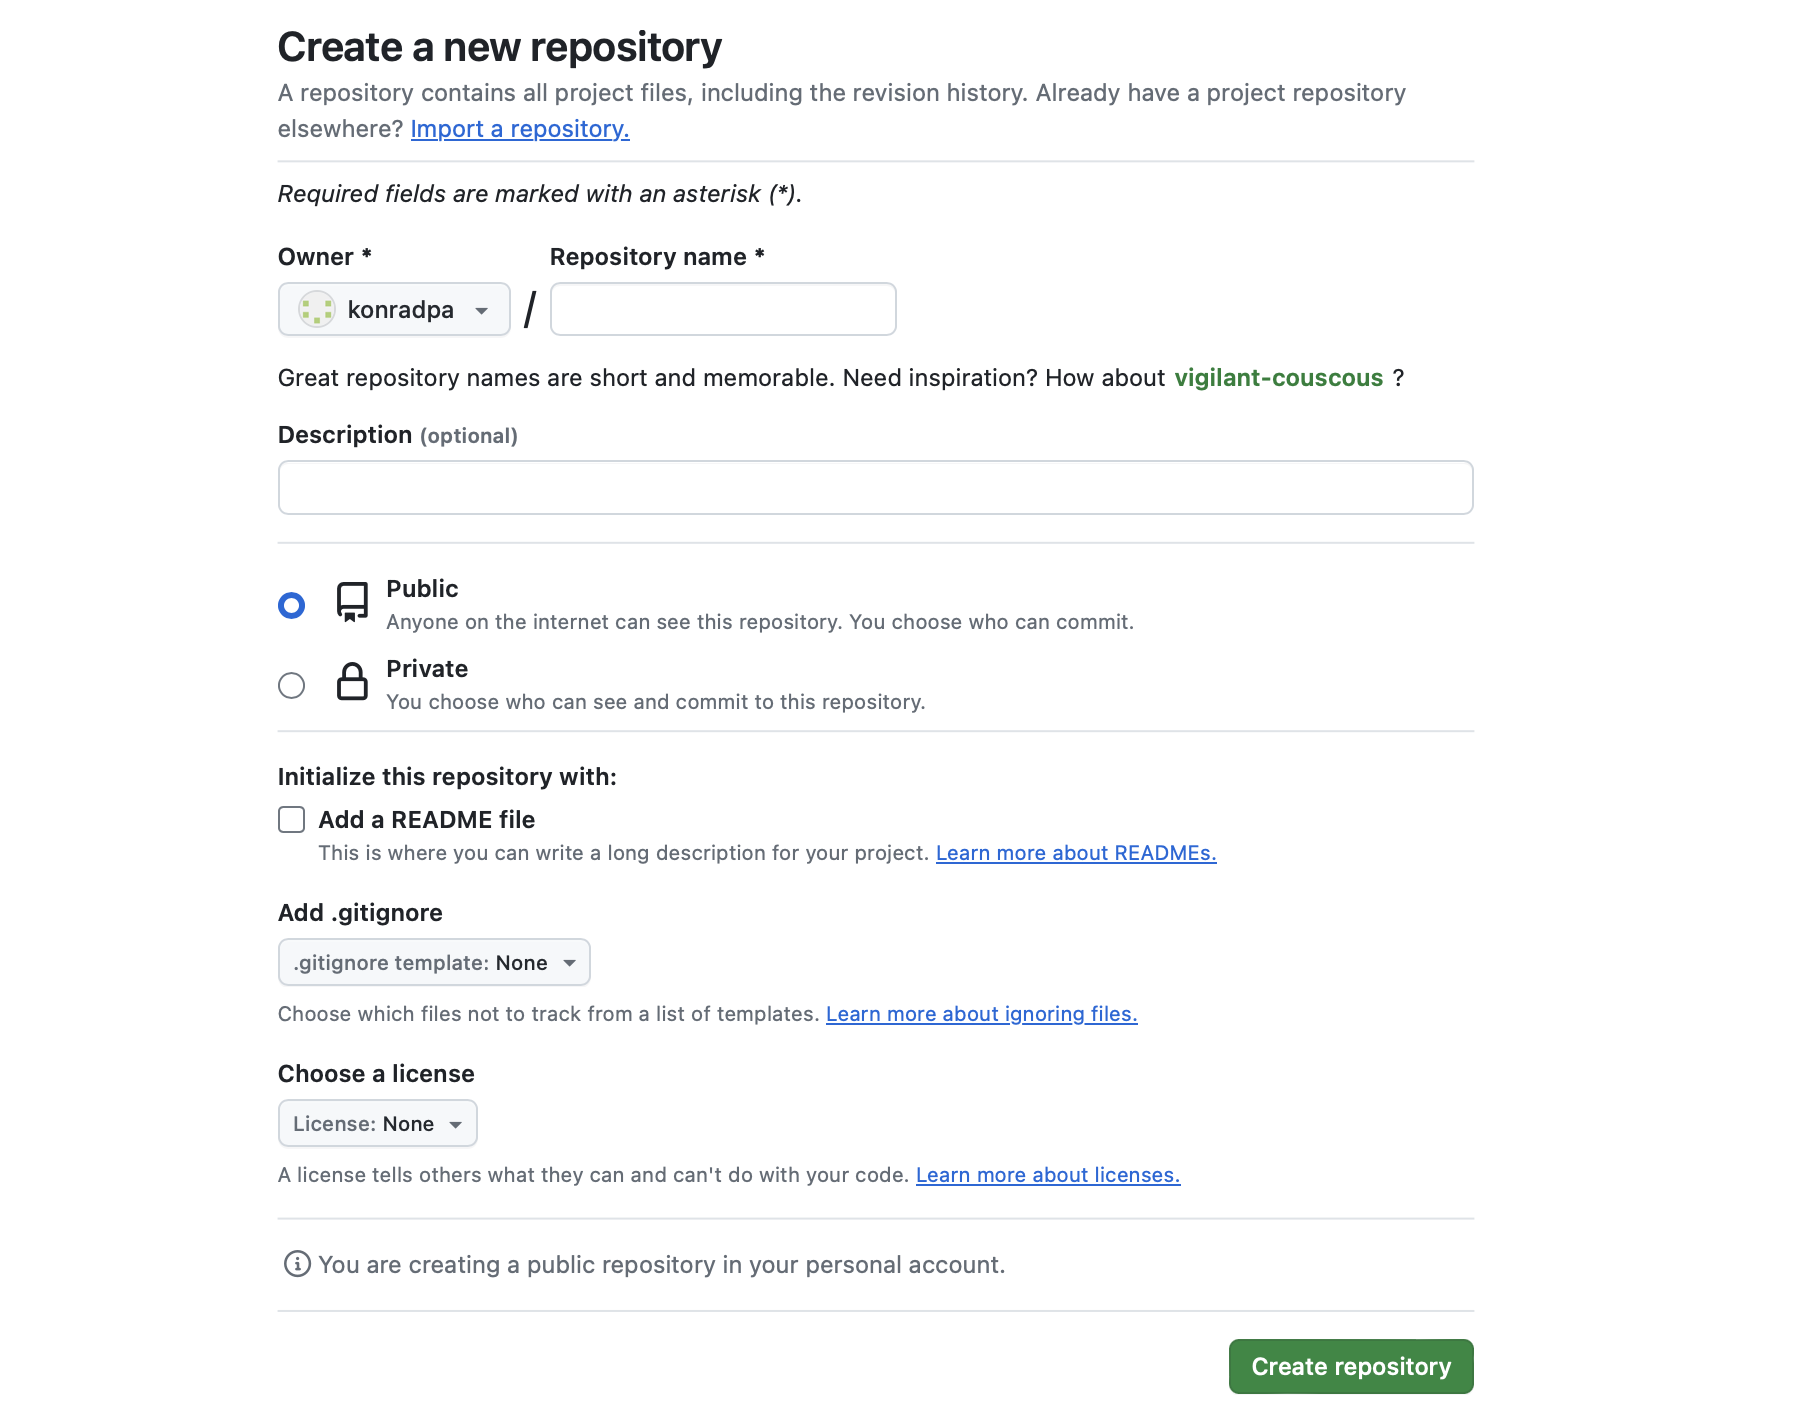
To create a new repository on GitHub, click on the “+” sign in the top-right corner of the GitHub page. From the drop down menu, select “New repository”. On the new repository page, you are asked to enter some details about your repository and select a few options (see Figure 9.4):
On the new repository page, as shown in enter a name for your repository. If you are planning to upload a local repository (a repository on your computer) to GitHub, it makes sense to choose the same name as on your computer. Also, we recommend to avoid white spaces and use hyphens (-) or underscores (_) to separate words in your repository name.
You can also add an additional (optional) description to provide more details about the content of your repository. The description will be shown on the main page of your GitHub repository and can help other users to understand the purpose of your repository.
Next, you can choose to make the repository public or private. A public repository can be viewed by anyone worldwide even if they don’t have a GitHub account. It’s like a public website on the internet. A private repository can only be viewed by you and any collaborators that you specifically invite to your repository. For more details about public vs. private repositories, see Tip 9.6 below.
At last, you can choose to initialize your repository with a few files, specifically a README file (find out more in the next chapter), a template .gitignore file (see the chapter on “First steps with Git”), or a license file.
Finally, click the green “Create repository” button at the bottom of the page to create a new repository with these settings.
When you create a new repository on GitHub, you can control who can see it by choosing if it’s public or private.
If it’s public, anyone on the internet can access it. If it’s private, only you, the people you specifically allow, and, for organization repositories, certain members can access it. For further details, see the chapter “About repository visibility” in the GitHub documentation.
If you have admin permissions for a repository, you can change its visibility. This means you can later still make a public repository private and private repository public, if needed.
To access the settings of a GitHub repository, go to the main page of the GitHub repository you want to configure and look for the “Settings” tab, usually located towards the right side of the repository’s navigation bar. Once you’re on the repository settings page, you’ll find various sections on the left sidebar that allow you to configure different aspects of the repository, such as “General,” “Branches,” or “Collaborators”.
In the “General” section you can, for example, rename your repository or default branch, change the repositories visibility or delete your repository. For a detailed guide on the repository settings, you can check out the GitHub documentation.
In the “Collaborators” tab of the settings, it is possible to add accounts which can view or add changes to your repository, even if it is private by entering their GitHub username or email address.
Creating a new repository on GitLab is quite similar to GitHub. GitLab calls repositories mostly projects, but you can use these terms interchangeably. After logging into your GitLab account, you need to follow these steps:
Click on the New Project button, usually found in the dashboard. Here you can choose to create a blank project. Alternatively you can also create one from template or import a project.
Next, fill in project details: If you create a blank project you will have to fill in the following details.
Project Name: Enter a name for your project. Avoid spaces and use hyphens (-) or underscores (_) instead.
Project Slug: This is the end of the URL of your project. It will be auto-filled based on your project name, but you can edit it. It should be URL-friendly. We recommend to use your project name to avoid confusion.
Description (Optional): Add a description to explain the purpose of your project.
Visibility Level: Choose the visibility of your project:
Like on GitHub, you can choose to initialize the repository with a README file, a .gitignore template, and a license file. If you plan to push an existing local repository, do not initialize with a README or other files to avoid conflicts.
Click the “Create project” button to create your new repository.
If you want to upload your local repository to a remote repository, make sure that you create the repository without initializing it with a README file or any other files. Initializing the repository with a README or any other files creates a commit in the repository. When you try to push your local repository, you will encounter conflicts because the histories of your local and remote repositories will differ.
To avoid this, create the remote repository empty. You can still add a README.md and other files through the GitHub interface after pushing your local repository.
Let’s assume that you have a local Git repository on your computer that you want to upload to a remote repository hosting service. To initialize an existing repository as a remote repository, you first need to create a new repository on your chosen hosting service (for example, GitHub or GitLab), as explained above. In the next step, you will need the URL of your remote repository.
Depending on your authentication method (SSH or PAT), you need to use a different URL when adding a remote repository to your local Git project. When you authenticate by providing a Personal Access Token (PAT) or (formerly) a username and password, you use the HTTPS (https://) URL of your remote repository. When you authenticate using SSH keys, you use the SSH (git@github.com) URL of your remote repository.
To add a remote repository to your local Git repository, navigate to your repository using the command line 1 and use the git remote command in combination with the URL of your remote repository.
Note the different URLs for HTTPS and SSH here (see Important 9.1):
Code (HTTPS)
git remote add origin https://github.com/user-name/repo-name.gitCode (SSH)
git remote add origin git@github.com:user-name/repo-name.gitReplace user-name with the repository’s user name and repo-name with the name of the repository. For details about the term origin, see Note 9.3.
Note the different URLs for HTTPS and SSH here (see Important 9.1):
Code (HTTPS)
git remote add origin https://gitlab.com/user-name/repo-name.gitCode (SSH)
git remote add origin git@gitlab.com:user-name/repo-name.gitReplace user-name with the repository’s user name and repo-name with the name of the repository. For details about the term origin, see Note 9.3.
This command is essentially telling Git:
“Add a remote repository named
originwith the specified location (URL).”
After running this command, your local Git repository will be aware of the remote repository, and you can synchronize changes between your local repository and the remote repository.
origin?
The term origin is a conventionally used name for the default remote repository. It’s a standard name and we recommend using it, but you could also choose any another name if you prefer. For example, if you are connecting to GitHub, you could also replace origin with github Specifying different names for the remote repository is useful (or even necessary) when you are configuring multiple remote repositories. For example, if you want to connect your local repository to both a GitHub and a GitLab remote repository, you could call those remotes github and gitlab, respectively.
If you want to check which remotes are configured for a local repository, run the following command:
Code
git remote -vBelow is an example output, in this case for the Git repository of this book. This output basically tells you that one remote called origin is configured, it shows the URL for the remote repository on GitHub, and indicates that this remote is used to both fetch changes from and push changes to GitHub. Can you tell from the URL if HTTPS or SSH is used? 2
Output
origin  git@github.com:lnnrtwttkhn/version-control-book.git (fetch)
origin git@github.com:lnnrtwttkhn/version-control-book.git (push)You might get into a situation where you want to change the URL of the remote repository. For example, you want to move your repository from an institutional GitLab repository to a remote repository on GitHub. In research, this could be the case when you developed the project in a private repository on your institution’s GitLab instance but now want to move the repository to a public repository to publish your code or data alongside a paper.
If you need to change the URL of an existing remote repository, you have two options: removing the remote and re-adding it, or setting a new URL directly.
origin):Code
git remote rm originCode
1git remote add origin <remote-repository-URL><remote-repository-URL> with the URL of your remote repository.
You can also directly update the URL:
Code
1git remote set-url origin <remote-repository-URL><remote-repository-URL> with the URL of your remote repository.
There is no feedback following this command. To check if the new URL was set as expected, you can enter git remote -v.
git remote commands
git remote: Lists all remote repositories associated with the current local repository.
git remote -v: Lists remote repositories along with their URLs.
git remote add <name> <url>: Adds a new remote repository with the specified name and URL.
git remote rm <name>: Removes the remote repository with the specified name.
git remote rename <old-name> <new-name>: Renames a remote repository from old-name to new-name.
git remote set-url <name> <url>: Update the URL of the remote to a new repository URL.
After you added a remote to your local repository, you are now able to “upload” your files to the remote repository using the command git push. This command is used to push your local commits to the remote repository. When you run git push, Git examines your local branch and its commits, and then pushes those commits to the corresponding branch on the remote repository.
Code
git push -u origin mainThe command above “uploads” the local branch named “main” to a remote repository called “origin” while setting it as the upstream branch. -u is used to set the upstream branch. It tells Git to remember the remote branch to which your local branch should be uploaded in the future.
TL;DR: Enter yes and hit EnterEnter.
The following message might appear when connecting to GitHub for the first time via SSH:
Output
The authenticity of host 'github.com (140.82.121.3)' can't be established.
ECDSA key fingerprint is SHA256:nThbg6GUVB7ZdnZ3iXYvgIhXZOL7NXqb7A4s9F8XY7w.
Are you sure you want to continue connecting (yes/no/[fingerprint])?
This message indicates that your system is trying to connect to a remote server (in this case, GitHub) over SSH for the first time, but it doesn’t yet trust the server’s identity.
If you are trusting the server’s identity, enter yes and hit EnterEnter. This will result in the following message:
Output
Warning: Permanently added 'github.com' (ED25519) to the list of known hosts.This message indicates that the GitHub server’s public key has been added to your ~/.ssh/known_hosts file permanently, so you won’t be prompted with this warning the next time you connect to GitHub over SSH.
After a successful push, you will get a message like this:
Output
Enumerating objects: 17, done.
Counting objects: 100% (17/17), done.
Delta compression using up to 8 threads
Compressing objects: 100% (12/12), done.
Writing objects: 100% (12/12), 2.11 KiB | 2.11 MiB/s, done.
Total 12 (delta 9), reused 0 (delta 0), pack-reused 0
remote: Resolving deltas: 100% (9/9), completed with 5 local objects.
To https://github.com/username/repository.git
   fb3efef..8f50685  main -> main
The git push operation involves enumerating, compressing, and writing objects to the remote repository. The output indicates the progress of these steps, including delta compression, and concludes with a summary of the pushed branch and commit range. In this specific example, changes from the local main branch (commit fb3efef) were pushed to the remote main branch (commit 8f50685).
You can push any branch. Use the relevant branch name in the git push command:
Code
1git push -u origin <YOUR_BRANCH_NAME><YOUR_BRANCH_NAME> with the name of the branch that you want to push.
It’s important to note that you need appropriate access and permissions to push to a remote repository. If you do not have write access, you won’t be able to push your changes. If you do not specify a branch and just run git push, Git will push the branch that “you are on” in the moment.
Git will verify if your local branch is up to date with the remote branch. If there are new commits on the remote branch that you don’t have locally, Git may reject the push and ask you to first pull (or “download”) the latest changes and merge them into your local branch to prevent overwriting or conflicts (find out more about pulling below).
git push flags
-u or --set-upstream: This flag is used to set the upstream branch for the current branch. It is typically used when pushing a branch for the first time to link the local branch with a remote branch.
--force or -f: Force pushes the local main branch to the origin remote repository, overwriting any changes that may have been made to the main branch in the remote repository.
--all: This flag pushes all branches to the remote repository.
--dry-run: This flag simulates the push operation without actually pushing any data to the remote repository. It’s useful for checking what would be pushed.
local_branch:remote_branch: This syntax allows you to push a specific local branch to a specific remote branch. Example:
Code
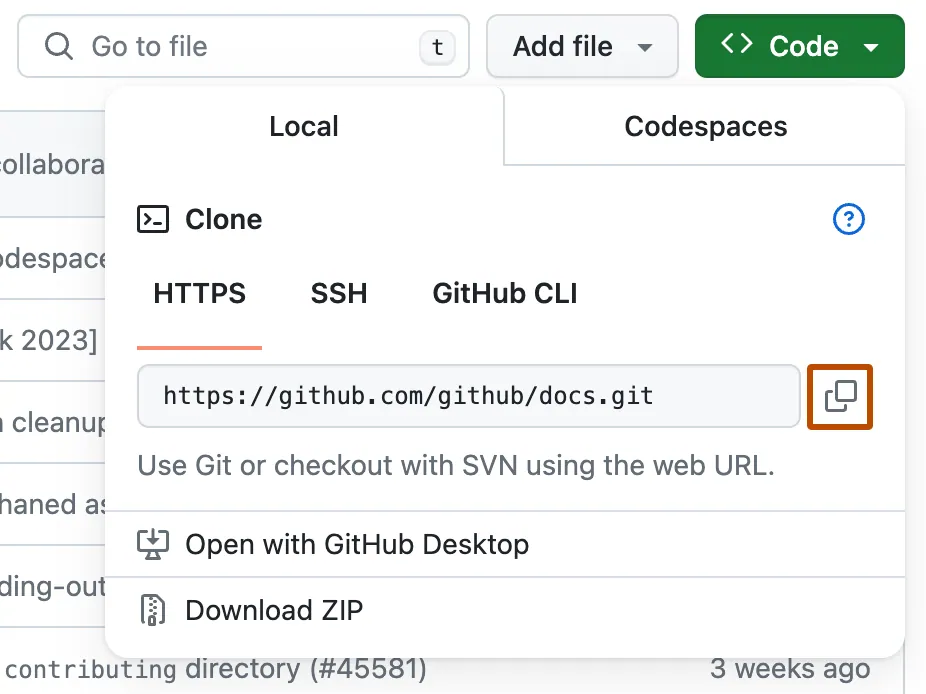
git push origin my_local_branch:my_remote_branchCloning refers to creating a local copy of a repository from a remote hosting service on your computer. When you clone a repository, you download all of its files, commit history, and branches to your local computer. Cloning allows you to work with the repository locally, make changes, and upload those changes back to the original repository (if you have write permissions). Cloning is commonly used when you want to contribute to a project or work on it independently. To clone a repository, you need the repository’s URL from the relevant repository hosting service. You can find the repository’s HTTPS or SSH URL on the repository page, if you click on the green Code button (see Figure 9.5).
Then use the command line to navigate to the directory where you want to clone the repository 3. Finally, use the git clone command followed by the URL of the remote repository:
Again, note the different URLs for HTTPS and SSH here (see Important 9.1):
Code (HTTPS)
git clone https://github.com/user-name/repo-name.gitCode (SSH)
git clone git@github.com:user-name/repo-name.gitReplace user-name with the repository’s user name and repo-name with the name of the repository.
Again, note the different URLs for HTTPS and SSH here (see Important 9.1):
Code (HTTPS)
git clone https://gitlab.com/user-name/repo-name.gitCode (SSH)
git clone git@gitlab.com:user-name/repo-name.gitReplace user-name with the repository’s user name and repo-name with the name of the repository.
Code
git clone https://github.com/lnnrtwttkhn/version-control-book.gitOutput
Cloning into 'version-control-book'...
remote: Enumerating objects: 4823, done.
remote: Counting objects: 100% (2333/2333), done.
remote: Compressing objects: 100% (759/759), done.
remote: Total 4823 (delta 1739), reused 1891 (delta 1541), pack-reused 2490 (from 1)
Receiving objects: 100% (4823/4823), 26.47 MiB | 6.50 MiB/s, done.
Resolving deltas: 100% (3336/3336), done.
Once the cloning process is complete, you will have a local copy of the Git repository. You can now work with the files in the repository, make changes, and commit your modifications locally. Remember to use the appropriate Git commands like git add, git commit, and git push to manage your changes and synchronize them with the remote repository as needed (for details, see the chapter on basic Git commands). By default, git clone will create a reference to the remote repository called origin, so you do not have to use git remote to create a remote repository.
cd into the repository after cloning!
Before you make changes to your newly cloned repository you should use the cd command to navigate into it. This step of changing into the repository directory is crucial. Forgetting to do so may lead to confusion, as any Git commands you run will not affect the intended folder but rather the one associated with the current working directory.
By default, git clone will clone the repository into a folder with the same name as the remote repository. For example, if you clone the repository of this guide using git clone https://github.com/lnnrtwttkhn/version-control-book.git, Git will create a folder called version-control-book and clone the repository into it. To clone the repository into a different folder, you can specify the new folder name as an additional “argument” in the git clone command:
Code
git clone https://github.com/user-name/repo-name.git new-folderThis will create a directory named new-folder and clone the repository into it.
Generally, we recommend to use the same name for the same repository (whether it’s a local copy or a remote repository) to avoid confusion. That being said, if you work on many repositories, it might become unavoidable to rename projects when you clone them locally. Note, that the repository will be unaffected by the name of the folder, so you can flexibly rename it as needed, also after you cloned it.
The git pull command is used to retrieve the latest changes from a remote repository and merge them into your local branch. Effectively, git pull first runs git fetch (see below) to fetch the latest changes from the remote repository and then integrates these changes into the local branch, either using git merge (for details, see the branches chapter) or git rebase (for details, see the section on rebasing), depending on the configuration. In other words, git pull is a git fetch followed by a git merge.
You can test this command by editing a file in your remote repository and then use git pull to update your local file with the change made on the remote repository. For details, on how to edit files directly on a remote repository, see the relevant section below. You can now open up your command line once again, and in the relevant repository use the git pull command to update your local file with the change made on the remote repository.
Code
git pullIf the pull is successful and there are no conflicts, you should see a message like this:
Output
Updating abc123..def456
Fast-forward file.txt | 2 +- 1 file changed,
1 insertion(+), 1 deletion(-)git pull command mean?
The first part of the message indicates the range of commits that were fetched and merged. In the example above, it shows that Git is updating from commit abc123 to commit def456. The “Fast-forward” message indicates that the local branch could be updated by moving the branch pointer forward, incorporating the new commits from the remote branch. This is possible when the local branch has not diverged from the remote branch, and there are no local commits that the remote branch does not have. The next line shows changes in the file file.txt. The 2 +- indicates that two lines were changed with one insertion and one deletion. The + represents an addition, and the - represents a deletion. The last line of the message provides a summary of the changes. It states that one file was changed, with one line inserted and one line deleted.
A regular git pull incorporates changes from a remote repository into the current branch. You can use the git branch command to verify which branch you are currently on (for details, see the branches chapter). If the current branch is behind the remote, then by default it will fast-forward the current branch to match the remote. If the current branch and the remote have diverged, the user needs to specify how to reconcile the divergent branches.
git pull command flags
--ff-only: Perform a fast-forward merge only. If the remote branch has new changes, Git will only update your local branch if a fast-forward merge is possible. Otherwise, it will abort the pull.
--no-commit: Perform the pull, but do not create an automatic commit after merging. This allows you to review the changes before committing manually.
--verbose or -v: Provide more detailed output during the pull operation. This can be helpful for understanding the actions Git is performing.
--squash: Instead of a regular merge or rebase, squash all the changes into a single commit. This can be useful for cleaning up the commit history or grouping related changes together.
--autostash: Automatically stash local changes before pulling, then apply them back after the pull is complete. This is handy when you have changes in progress and want to pull in the latest changes from the remote branch.
The command git fetch is used to keep up-to-date with changes in the remote repository, without merging them into your local branch. Instead of immediately merging the changes, Git will update all your local tracking branches to the state of the remote branch. That means if you have made changes in your remote repository to a branch, for example called feature, git fetch will leave your local feature branch as it is, but will update your remote tracking branch called origin/feature. To view your remote tracking branches, you can use git branch -r. After fetching, you can use git switch to review the changes on these branches. If you want to integrate the changes into your local branch, you can either now use git pull to directly update your local branch, or use git merge origin/branchname when you are on your local branch that you want to update. Essentially: git pull= git fetch + git merge.
git fetch is arguably the safer option compared to git pull since it retrieves the changes from the remote repository without making any changes to your local working directory and staging area. This allows you to review the changes fetched from the remote repository before integrating them with your local branch.
This can be especially useful when, for example, your project collaborators are working on a different bug than you. If you want to check their progress and see if it affects your work, you can use git fetch to review their changes. By doing so, you may discover that their updates could interfere with your own work. You can then postpone the merge and adjust your work accordingly to accommodate their changes. In contrast, using git pull would automatically apply their changes, which could potentially disrupt your progress without prior review.
You can add or edit files directly on GitHub. This is particularly useful if you need to make quick changes without accessing your local repository.
example.txt).You can add or edit files directly in GitLab. This is particularly useful if you need to make quick changes without accessing your local repository.
example.txt).main). In that case there is of course no merge request.main). In that case there is of course no merge request.| Authors | Title | Website | License | Source |
|---|---|---|---|---|
| The Turing Way Community (2022) | The Turing Way: A handbook for reproducible, ethical and collaborative research | CC BY 4.0 | ||
| Chacon and Straub (2014) | Pro Git | CC BY-NC | ||
| GitHub (2023) | GitHub Docs | CC BY-NC 4.0 |
| Command | Description |
|---|---|
git remote |
Manages remote repositories |
git clone |
Creates a local copy of a repository |
git pull |
Fetches and merges the latest changes from a remote repository into the current branch |
git fetch |
Updates remote tracking branches |
git push |
Uploads local commits to a remote repository |